When you purchase through the links on my site, you support the site at no extra cost to you. Here is how it works.
I would like to share with you some of the best glitch and stutter plugins I found for producers who need rhythmic chops, buffer freezes, tape stops and controlled digital damage without spending an afternoon slicing audio by hand and drawing automation for every edit.
For this specific list, I picked these: Inear Display Ephemere, Illformed Glitch 2, iZotope Stutter Edit 2, Aberrant DSP Digitalis, Output Portal, and few more picks. Stock beat repeat devices will get you a basic stutter, and honestly that’s fine for a lot of jobs, but they usually stop at one effect, one subdivision and one static setting for the whole clip.
1. Inear Display Ephemere
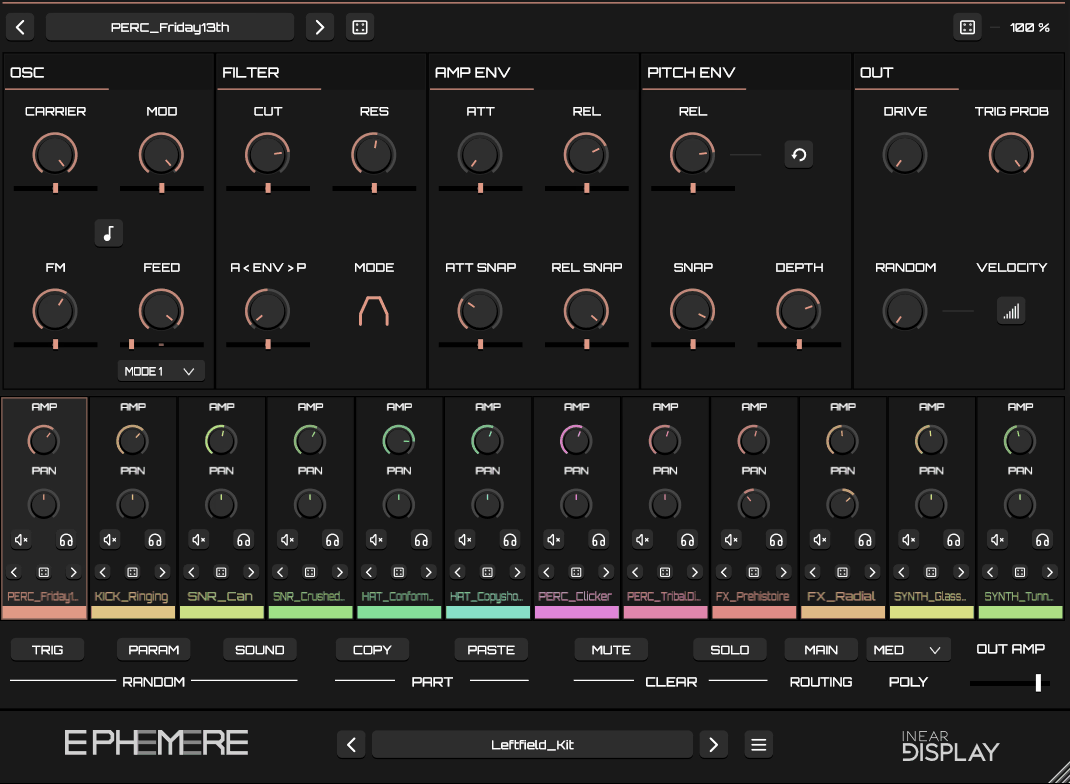
I have to say Ephemere doesn’t try to sound clean, and that’s honestly the whole appeal to me. It’s an FM percussion synth, currently sitting at version 1.6,.
So one MIDI clip is enough to drive the entire kit. At the same time, I’ve found it’s noticeably better at snares, cymbals and metallic hits than it is at kicks, which just comes down to how FM synthesis behaves.
If you’re making glitch, breakcore or IDM where the drums are supposed to sound a little broken anyway, I don’t think that limitation matters much.
Here is more what you get:
- Twelve FM Tracks
Each track runs its own feedback-capable FM oscillator, a multi-mode filter, amp and pitch envelopes, and an output stage with drive on it.
From my experience the feedback control is where most of the character actually comes from, because pushing it turns a clean bell-like hit into something metallic and unstable in a way a normal drum synth just won’t give you.
I like setting up three or four channels as variations on the same hit and triggering them in sequence, so a stutter changes texture with every repeat without needing four separate tracks to pull it off.
- Preset Library
Around 180 factory sound presets are included
- Per-Note Value Ranges
Underneath each synth control there’s a slider that sets a range of values, and a value inside that range gets picked at random with every incoming MIDI note. What stands out to me is that this happens per note instead of per pattern, so no two hits come out identical even over a flat 16th-note line.
- Trigger Probability
Every channel has a Trig Prob control deciding how likely that sound is to fire when its note arrives, so I find patterns thin out and fill back in on their own.
2. Illformed Glitch 2
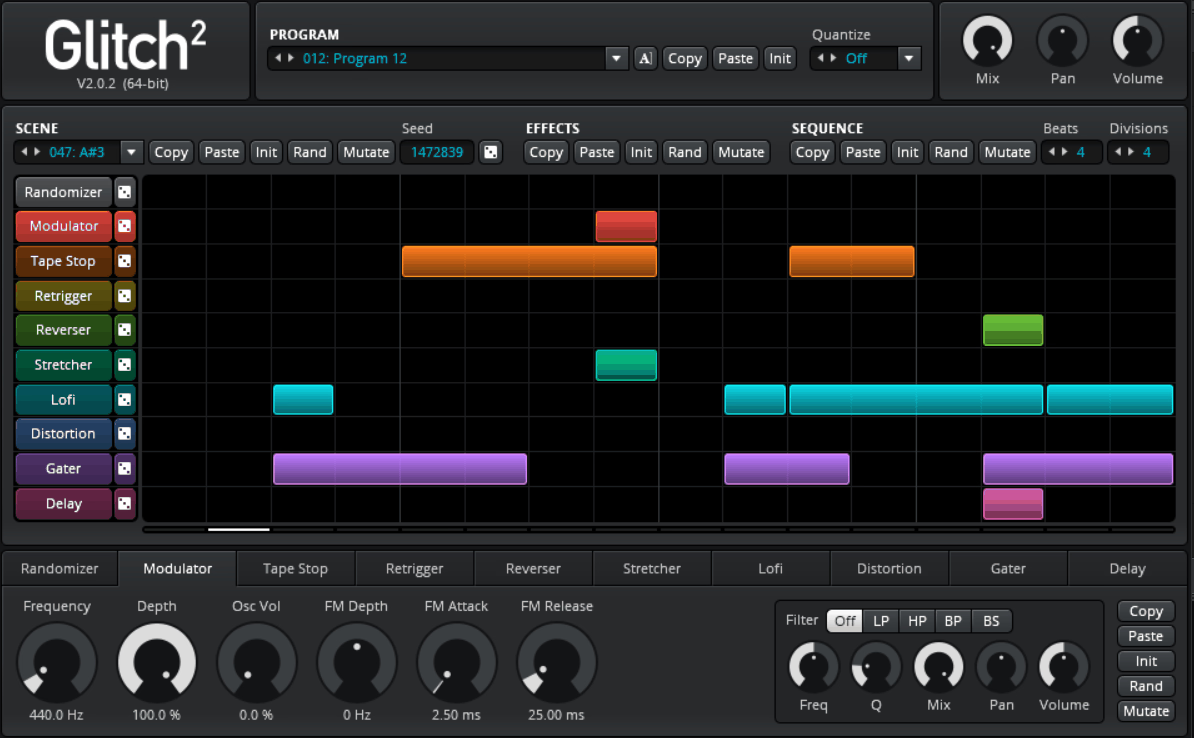
A lot of the chopped, retriggered, tape-stopped moments on electronic records from the late 2000s onward trace back to a plugin that started out as a free Windows release, and producers passed it around for years. Illformed Glitch 2 is the commercial sequel to that plugin.
It’s currently at version 2.1.5, which was put out in memory of its creator, Kieran Foster. I’d say it’s still one of the more direct tools in this category, mostly because the workflow never makes me think about routing or modulation assignments before I can actually hear something.
- Ten Effect Modules
The module list runs Retrigger, Reverse, Stretcher, Tape Stop, Gater, Delay, Lofi, Distortion, Modulator and Shuffler, each with its own filter, pan and volume alongside a handful of dedicated parameters.
In my opinion the Retrigger and Stretcher pair does most of the real work in a typical pattern, with Tape Stop saved for the end of a phrase.
- Multi-Lane Sequencer
Every module gets its own lane, so several effects can hit the same moment instead of taking turns, and blocks lock to musical divisions like 16th notes or 8th note triplets so nothing drifts.
I found that building in layers works better than designing a whole bar at once, meaning I get the retrigger rhythm right first, then stack a second lane underneath it for color.
- 128 Scenes Per Program
Each program holds 128 scenes, and every scene keeps its own pattern, timing and effect settings, triggered straight from MIDI notes. That turns your keyboard into a bank of fills, where one key gives a light retrigger and the next one hands you something far more aggressive.
There are gate and latch trigger modes on top of that, plus a loop on/off switch for one-shot playback, and a lock that pins the scene you’re editing so incoming MIDI changes get ignored while you work. I’ve found that makes editing during live playback genuinely practical instead of a fight.
3. iZotope Stutter Edit 2
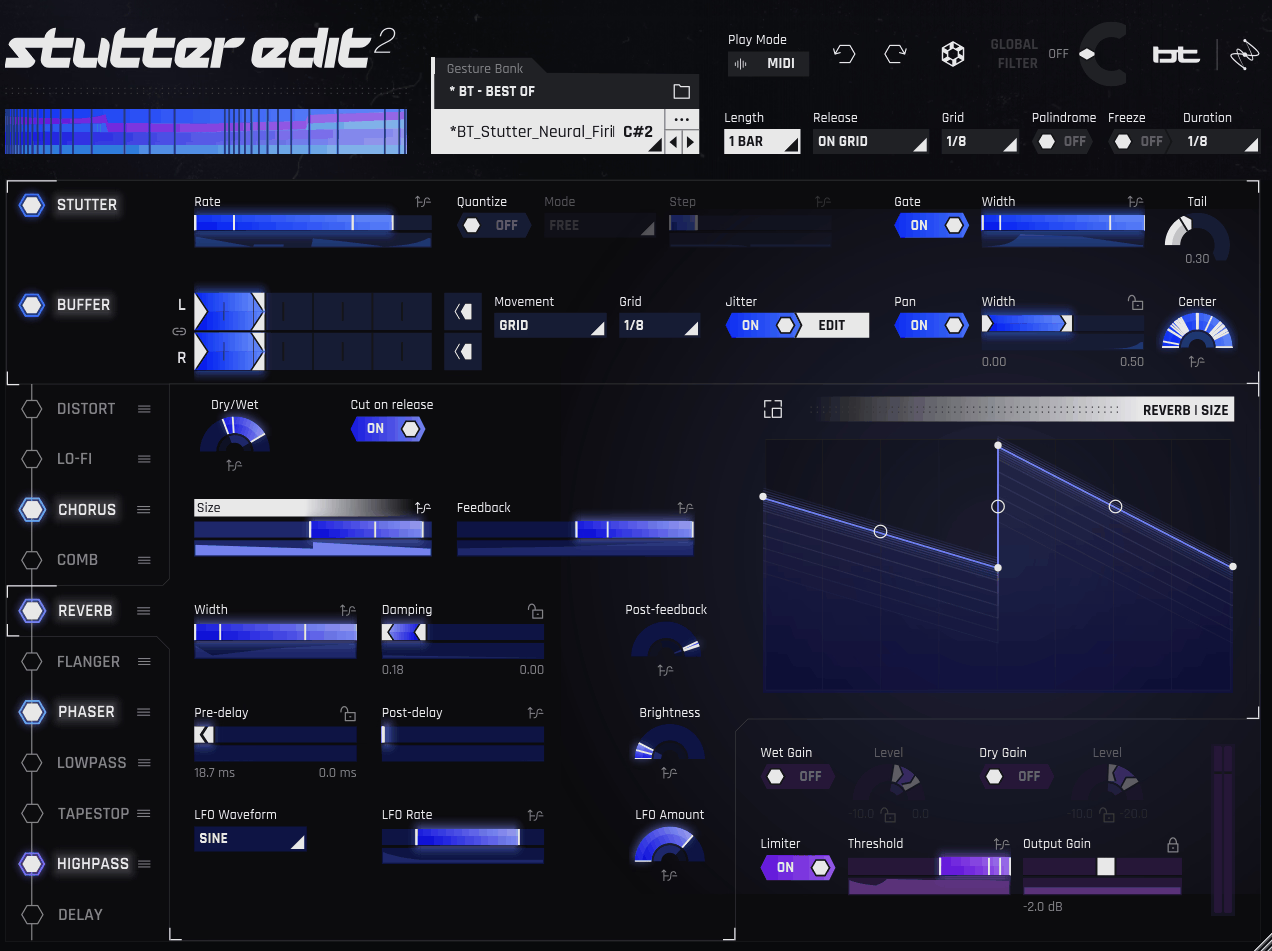
The idea behind Stutter Edit 2, made together with BT, is that each preset is a Gesture you fire from a MIDI note, and a whole rhythmic edit unfolds from that one keypress instead of you drawing it in by hand. Gestures live inside Banks that map automatically across your keyboard.
So one bank might put vocal transitions on a set of keys and master bus fills on another. I’m not gonna lie, setup is the least friendly part of this plugin for me.
- Gestures And Banks
Hundreds of Gestures built by BT and iZotope’s sound design team are included, covering cinematic sweeps, trap-style hat chops, trance gates, synth bass modulation and full breakdowns.
Building your own bank means dragging Gestures onto specific keys until the layout matches how you actually play, though from what I can tell most people never need to go further than the factory content, which is deep enough to cover a full record on its own.
- Curve Editor
Every knob and slider can move in time with your project through the Curve Editor, using a premade shape or one you draw by hand. Set a Range with the blue sliders, pick a curve, and the parameter travels through that range for as long as the Gesture plays.
- Stutter And Buffer
These are the core controls, chopping incoming audio at any subdivision of the beat, and pushed hard enough they turn percussion into pitched, synthetic material instead of rhythmic hits.
- Expanded Module Set
Version 2 brought in Distort, Lo-Fi, Chorus, Reverb, Comb, Flanger, Phaser, Tapestop and Delay modules, with a flexible limiter sitting in the output section, and each one accepts Modifiers and Curve Editor control the same way the core stutter engine does.
4. Aberrant DSP Digitalis
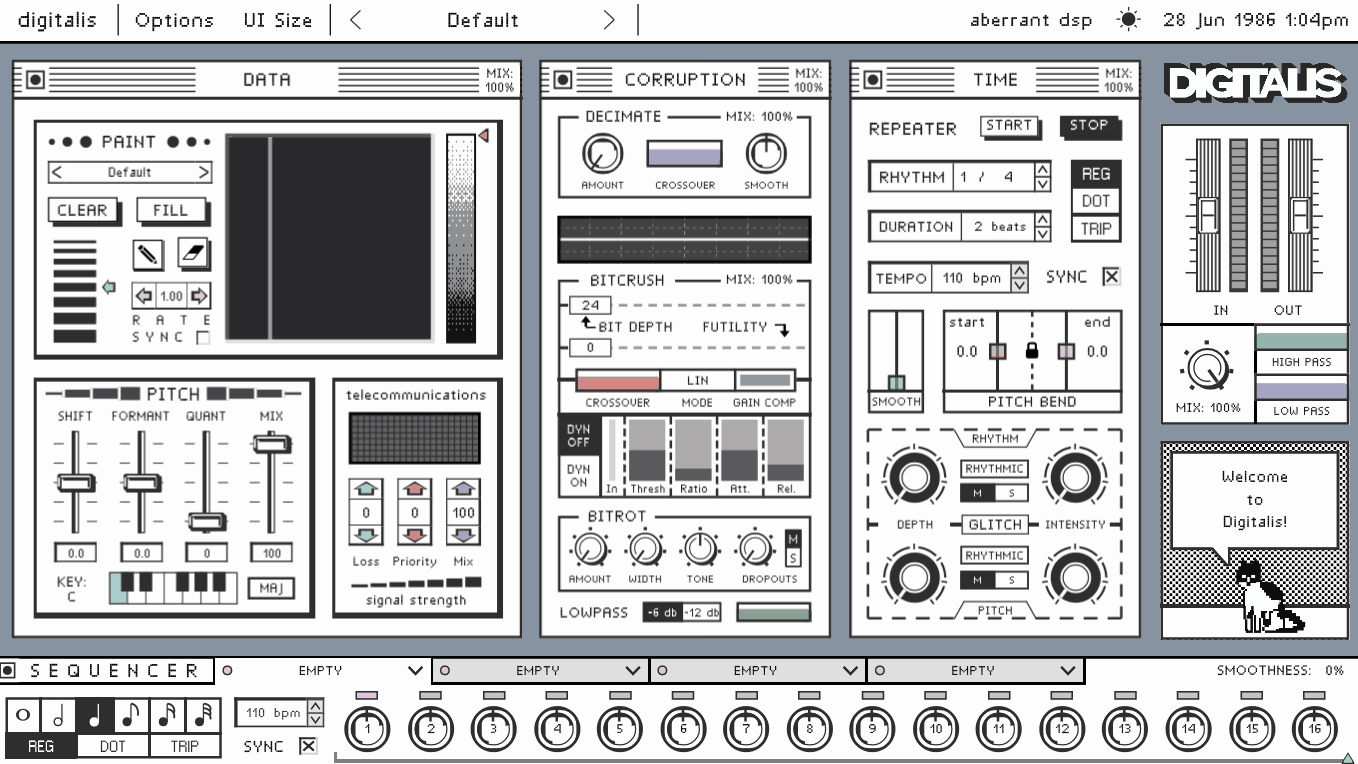
Nearly every audio destruction plugin I open leans on analog references, tape hiss, tube grit, blown speakers, and that’s exactly why Digitalis feels different from the first minute.
I like how it takes its cues from bad converters, damaged CDs, weak connections and file corruption, and the interface backs that up by looking like an old Mac desktop, menu bar included. That’s more than a visual joke, though.
Windows can be rearranged, and the order you place them in actually changes the signal flow, so crushing before pitch shifting versus after it is a drag of the mouse. There’s a built-in assistant called Jon that walks you through each section, and 98 factory presets to start from.
- Bitrot Section
Data loss and corruption on aging digital media is what Bitrot emulates, and it behaves differently from the bitcrusher next to it. A crusher reduces resolution evenly across the whole signal, while this produces uneven, patchy damage that comes and goes.
I like how it sounds on sustained pads and vocal tails, where the signal holding still gives the corruption something to actually chew on.
- Crushing And Decimating
The bitcrush section runs multiple modes and responds to your incoming level instead of one fixed amount, so grit shows up on transients and backs off in the tails. Downsampling lives in its own separate section.
I think keeping the two apart pays off, since aliasing and quantization noise are different colors and you rarely want equal amounts of both.
- Spectral PaintBox
Filtering happens by drawing custom patterns instead of turning a cutoff knob, and painting gaps into the spectrum in a rhythmic shape gets you stuttered, hollowed results a normal filter sweep can’t produce.
- Sixteen-Step Sequencer
A 16-step tempo-synced sequencer with 4 effect slots animates parameters in time with your track, stepping through values instead of just switching effects on and off.
5. Output Portal
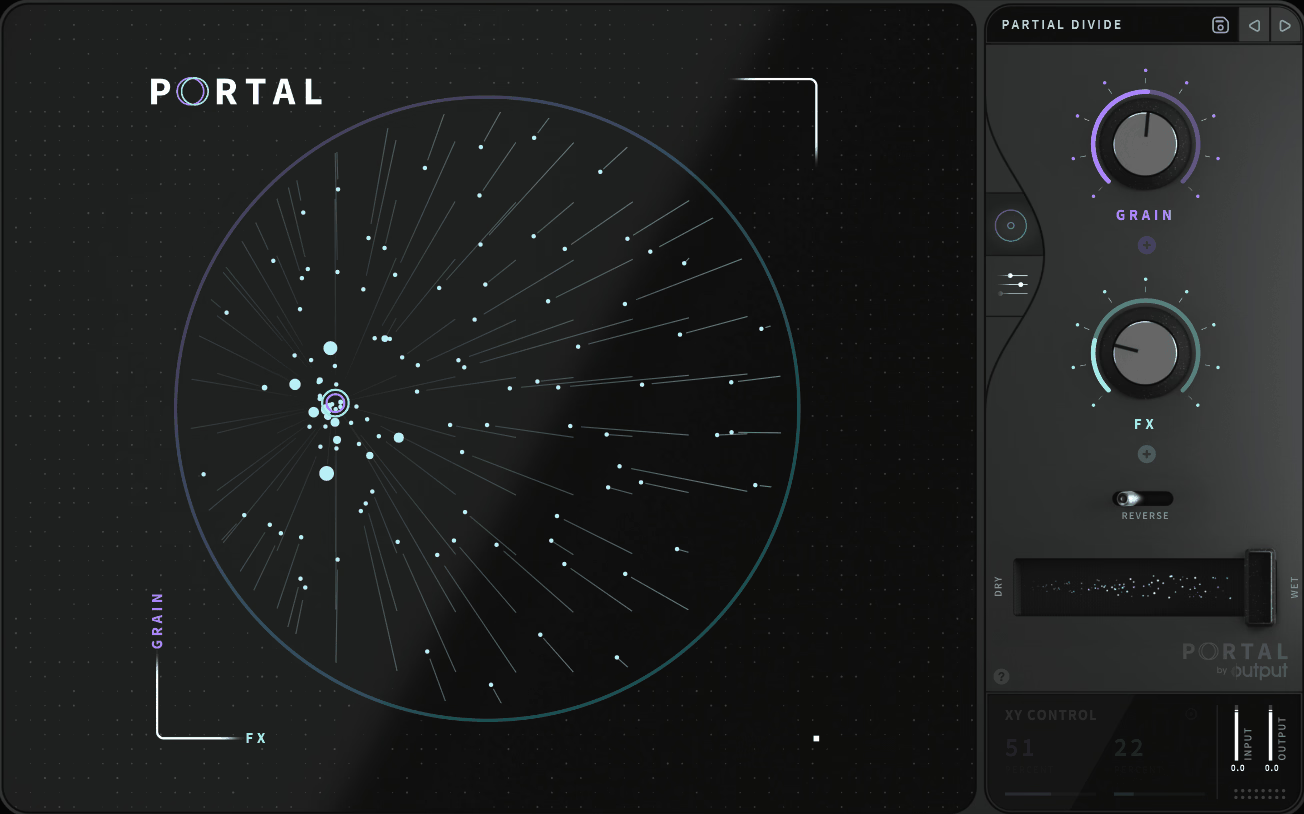
Granular processing has a reputation for turning whatever you feed it into an abstract cloud, and Portal was built to argue with that reputation directly. Sounds get resynthesized so the result stays recognizably related to the source.
I noticed that’s a design decision you pick up on inside about ten seconds of loading a preset. The main page centers on a large XY pad driving two assignable macros, wrapped in a circular visualizer tied to the grain parameters.
That said, I’ve found results can be genuinely random at times, so I’d treat the 250+ factory presets as starting points and expect to spend a few minutes in the advanced page on anything you plan to keep.
- Tempo-Synced Grain Delay
Grains land on the grid when you sync them, and that’s really the whole difference between a rhythmic stutter and a general wash of texture. Personally, I think this is the single most useful control in the plugin for the kind of work this post is about.
Set the delay to a 16th and a vocal starts skipping in time with the track. Pull it to a dotted value and the same source falls behind the beat on purpose, and both of those are usable ideas within a couple of seconds of each other.
- Seven Internal Effects
Seven built-in effects cover ground from bit reduction and distortion through chorus, delay and reverb, with a master compressor and filter on the end of the chain.
- Time Stretch Engine
Sounds can be slowed and stretched with the option to sync to master tempo or leave them unsynced, and synced is where the rhythmic results live while unsynced drifts and suits pads and transitions better
6. Unfiltered Audio Sandman Pro
Delay probably isn’t the first category you’d search when you want stutter effects, and that’s fair, since most delays repeat your signal politely and stay out of the way.
A few are built around a different question though, namely what happens once the buffer stops moving forward. Sandman Pro covers both the boring job and the destructive one, which I think is a decent argument for giving it a permanent slot in a template.
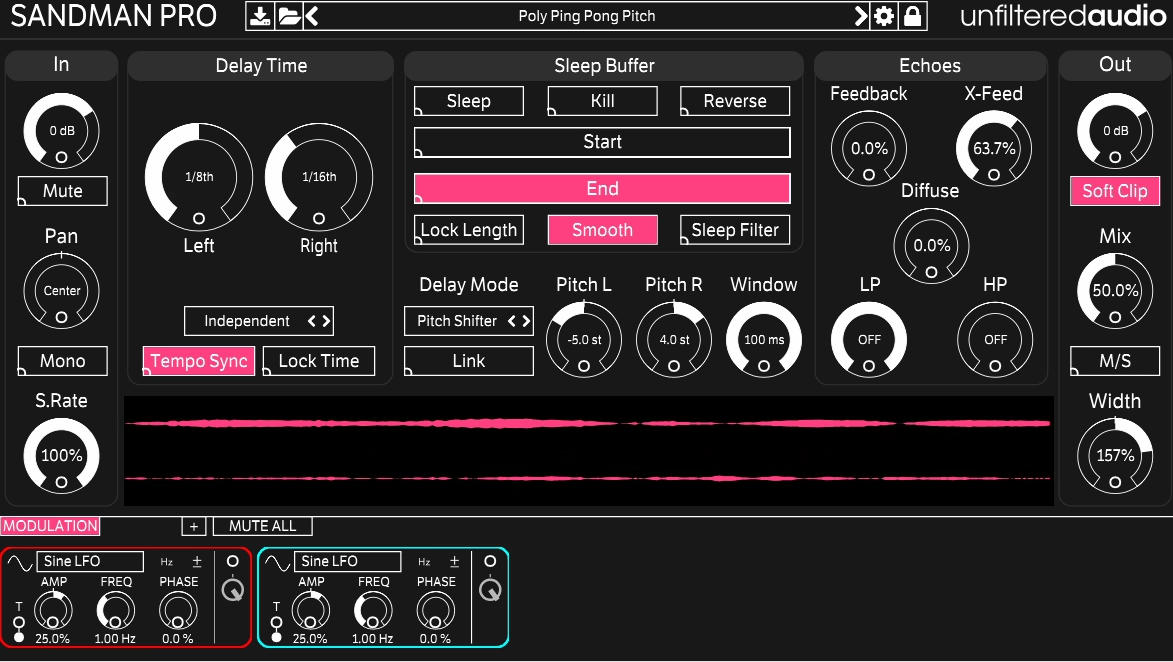
Sleep is the signature control, and it freezes the delay buffer so no new audio gets written in, with the length of the frozen chunk coming from the Delay Time, Start and End controls. From there the frozen material can be re-pitched, downsampled, played backward, dirtied with noise and modulated.
- Seven Delay Modes
Seven modes are on offer, including Classic Tape, Modern Instant, Reverse, Pitch Shifter, Glitch Shifter and Multi-Tap, each with its own set of controls. Modern Instant modulates delay time without producing pitch artifacts.
I’d say that’s more practical than it sounds, since moving a vocal from a tight double into long echo trails across one phrase usually means fighting warbling artifacts, and this mode simply doesn’t produce them.
- Modulation System
Eight modulator types are available with nearly every control open to assignment, including a step sequencer alongside the LFOs, so patterns don’t have to stay smooth and sine-shaped.
I like modulating the Start and End points on a frozen buffer with a slow sequencer, since the loop keeps rewriting itself over several bars without you touching anything, and it stays in time the whole way through.
7. Devious Machines Infiltrator 2
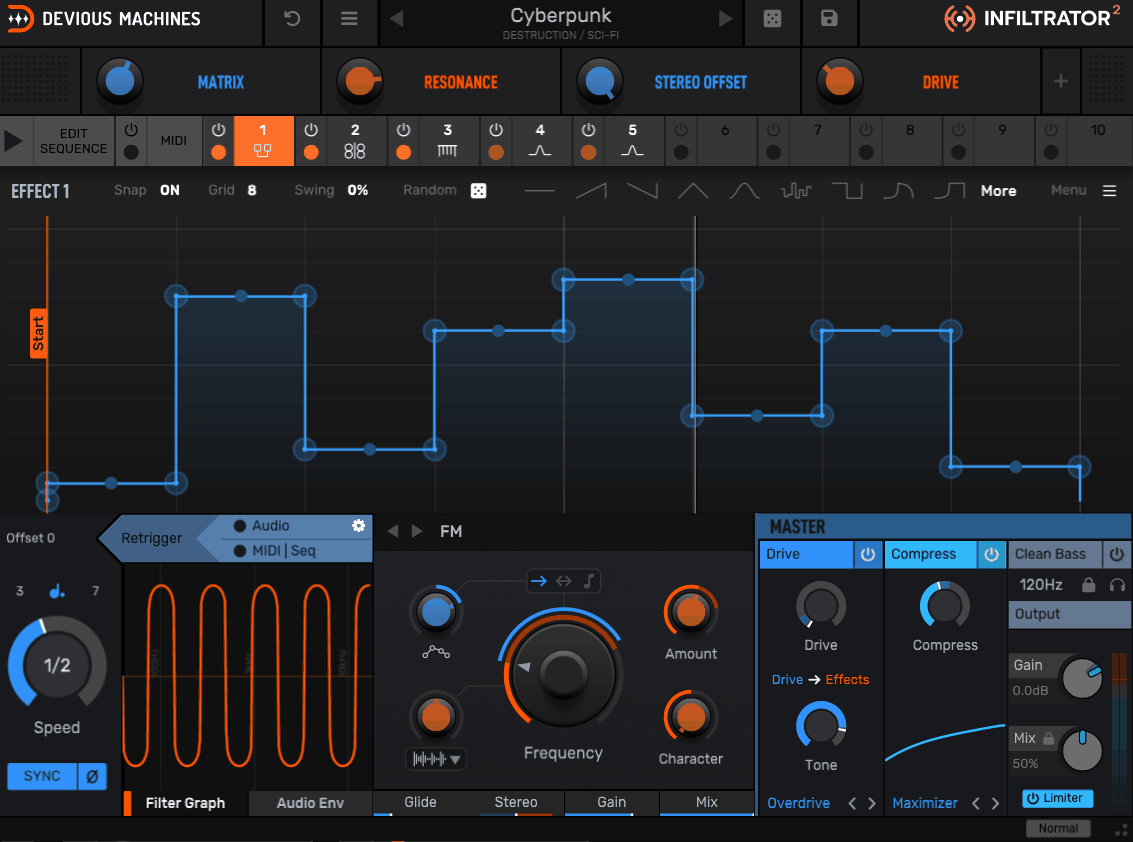
Building a chain of ten effects is something your DAW already lets you do, so the harder question is what happens when those effects need to switch on and off in rhythm. Automating that by hand is possible but honestly fairly miserable.
It exists for that exact job, holding ten effect modules you fill from a library of 54 effects, many of them carrying multiple sub-types. I must say the interface looks like a lot when you first open it.
I’d recommend watching the getting started video before diving in with Infiltrator 2, because in my experience twenty minutes there saves you an afternoon of guessing. Once the layout clicks it moves fast, and the 1500+ presets lean on macro controls so you always get one or two meaningful knobs to grab instead of a wall of parameters.
- Fifty-Four Effects
Filters run from crisp digital models to liquid analog ones, plus formant and comb types, and the overdrive module carries 12 different models. There’s also pitch shifting, FM, delay, reverb, a vocoder, a granular time-stretch module and 14 spectral effects that use FFT filtering to pull specific frequency components out of the signal.
- Thirty-Two Step Sequencer
Each of the ten modules switches on and off per step across a 32-step sequencer, separately or together, and at different speeds if you want them drifting against each other. That’s what places this in glitch territory for me, instead of general multi-effect duty.
- Dual Envelopes Per Effect
Every effect gets two tempo-synced multi-segment envelopes you edit graphically, and those curves run from your DAW clock, from the input level, or from MIDI notes. I think having input-level triggering available is a bigger deal than it looks, because effects that fire off your own transients feel connected to the performance instead of pasted over it.
- Master Section
Outside the main chain sits a drive module with 12 models placeable before or after everything else, a compressor with four models running from transparent to a deliberately aggressive Overkill setting, plus a low shelf EQ and output stage.
8. AKAI Flex Beat
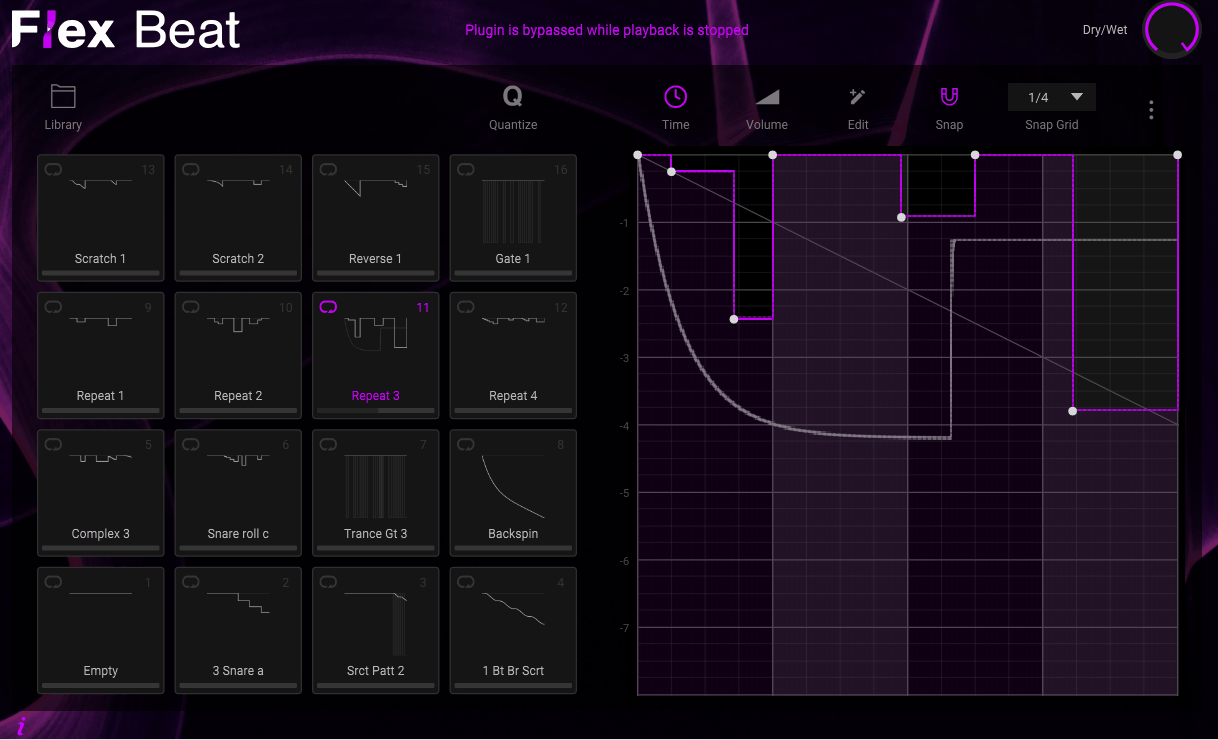
If you’ve ever needed a quick DJ-style transition, a backspin or a half-time drop and didn’t want to chop it by hand, that’s the job Flex Beat is built for. It works by drawing time and volume envelopes across a grid that runs exactly one bar at your project tempo.
Everything from beat chops to scratches to reverse and half-time comes out of that same mechanism. If you’ve spent time with Gross Beat this will feel immediately familiar to you.
It actually reads and writes the same .fnv envelope format, so existing patterns carry over. On the flip side, editing at fine resolutions is the weak spot here for me, the window stays small and precise node work gets fiddly, so I’d lean on the preset library more than you might with other plugins on this list.
- Time And Volume Envelopes
Two envelope types get drawn in the grid editor using curve points and tension points, one warping playback position and the other controlling level, with snap, adjustable curve types and a sliding point move function that shifts everything to the right of a moved point.
- Sixteen Performance Pads
Presets get assigned to 16 pads you trigger live or sequence from MIDI, and you can preview a pattern while audio is playing before committing it to a pad, which saves a lot of loading and unloading.
Building a small bank of go-to transitions this way, a couple of backspins, a gate, a half-time drop, means I’m not digging through the library mid-set.
- Three Playback Modes
One Shot, Loop and Hold decide how a pad behaves once triggered, and Hold is the one I reach for most when I’m playing parts in by hand instead of sequencing them.
9. Sugar Bytes Turnado
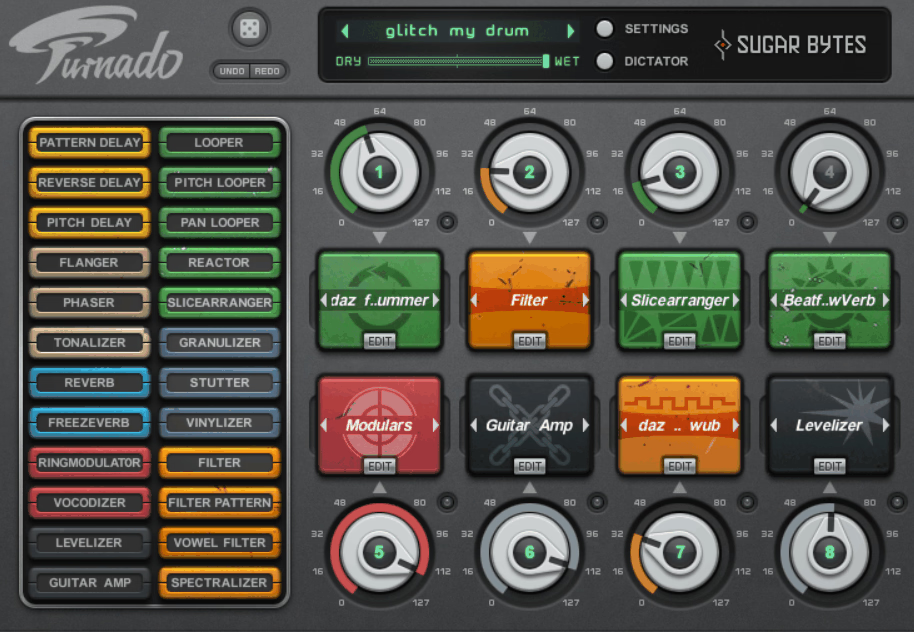
When your glitching happens live with hands on a controller, layout matters more than raw feature count, and Turnado worked that out early. It gives you eight slots with one knob each, where any of 24 effects gets dragged in.
The knob both engages the effect and controls how far it goes, turned fully down for off and brought up to engage and then intensify it. The effects are grouped by color into categories spanning delays, modulation, reverbs, transformation, amplifier, loop effects, DJ tools and filters.
I’d say it’s the most immediately playable plugin in this roundup, since there’s nothing to configure before you start making noise.
- Dictator Fader
The Dictator is one fader that moves all eight knobs at once, and each slot gets its own automation lane where you place points determining what that knob does as the fader travels. It takes a little while to click, but once it does you’re programming an entire transition into a single fader throw.
For build-ups and breakdowns, I think it’s the fastest tool covered in this whole post. It also takes host automation or MIDI like any other control, so a move I perform by hand can be written into the arrangement afterward without rebuilding it from scratch.
- Expert Mode Editing
Opening a slot’s edit page gives you five parameters, four specific to the chosen effect plus a dry/wet amount, and each can be tied to the main knob and scaled independently, so one movement opens a filter, shortens a delay and raises wet level all at once.
- Per-Slot Modulation
Every slot carries two LFOs or step sequencers plus an envelope follower, assignable through a color-coded system, with a rocker switch on each parameter setting whether the modulator pushes it positive or negative.
I find the envelope follower most useful of the three, since effects that react to your own transients feel tied to the track instead of sitting on top of it. That said, modulation depth is set per parameter as on or off instead of with independent amount control, which is a small limitation worth knowing about.

Hey, I’m Vil, I started this site to help you find the best audio plugins covering various categories including synths, pianos, strings, and effect tools of all sorts as well. I pick these plugins based on various criteria so it best matches the actual topic.