When you purchase through the links on my site, you support the site at no extra cost to you. Here is how it works.
Saturation can add weight, bite, warmth, or movement, but the right plugin depends heavily on what you want it to do. Some are built for subtle harmonic enhancement, while others are better suited to aggressive distortion, multiband shaping, or vintage degradation. This list covers both ends, with SSL Native X-Saturator, Decapitator, FabFilter Saturn 2, HG-2MS, and RC-20 Retro Color among the main picks.
You’ll also find more specialized options like Moog MF-109S and Softube Harmonics when basic saturation is not enough.
I’ll start with SSL Native X-Saturator, which gives you control over harmonic character, drive, depth, shape, and headroom instead of simply throwing distortion at the signal. With that being said, here are my picks of the best saturation plugins:
1. SSL Native X-Saturator
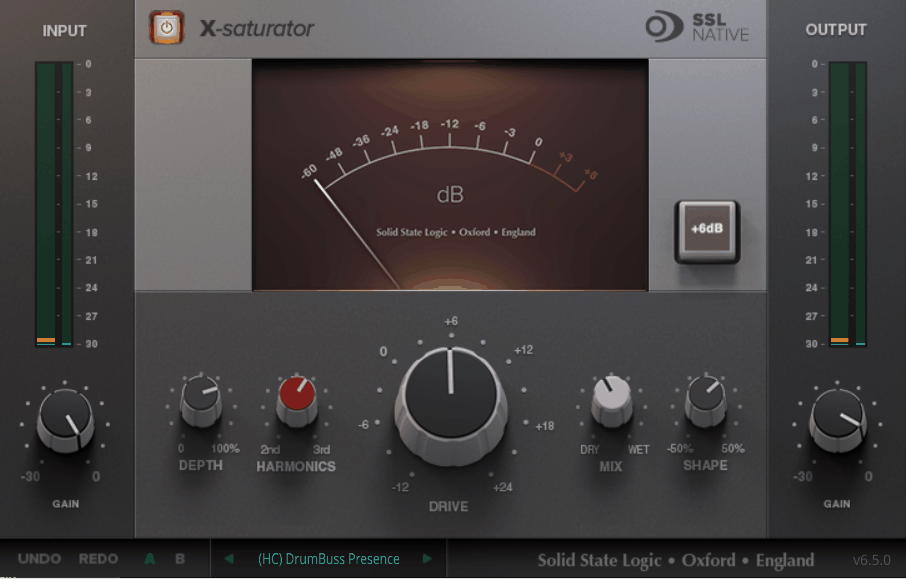
There’s a reason mix engineers reach for SSL Native X-Saturator when a track needs that classic console push. Most single-knob saturators lock you into one flavor of harmonic distortion, but this one blends two eras of analog circuit behavior into a single continuous sweep, instead of forcing you to choose between valve character and transistor bite.
I like that the plugin gives you real control over how aggressively that character gets applied, instead of just an on and off amount of grit.
There’s a level of finesse here I don’t always find in console-style saturators, since you can shape not just how much saturation happens but how it actually feels once it lands on your track.
- Harmonics Blend
The Harmonics control lets you sweep between second-order valve-style warmth and third-order transistor-style grit instead of picking one fixed flavor. I find dialing it toward the middle gives you a hybrid tone that’s harder to pull from single-flavor saturators, so one instance covers ground you’d normally need two separate plugins for.
- Drive Control
Drive pushes how hard your signal hits the virtual gain stage, increasing saturation right alongside how much the plugin colors the tone. I usually start Drive low and work up gradually, since you’ll notice the character shift noticeably even over a narrow range.
- Depth Control
Depth controls how much of the generated harmonic content actually folds back into your mix, running from clean at 0% up to fully saturated at 100%. I like keeping this separate from Drive, since you can push the input hard for tonal shaping while still dialing back exactly how much saturation lands.
- Shape Adjustment
Then, you have Shape that decides whether the added harmonics come across smooth or hard-edged. On vocals I keep this gentle, but on drum busses I’ll push it toward the harder end for extra bite, and you’ll notice the difference between the two settings is more dramatic than a single knob has any right to be.
- Headroom Boost
Lastly, flipping on Headroom adds 6dB of extra internal clearance before digital clipping kicks in.
I mostly forget this button exists until I’m pushing Drive hard on a drum buss and start hearing ugly digital edges creep in, and that’s exactly when reaching for Headroom fixes the problem for you.
2. Waves Abbey Road Saturator
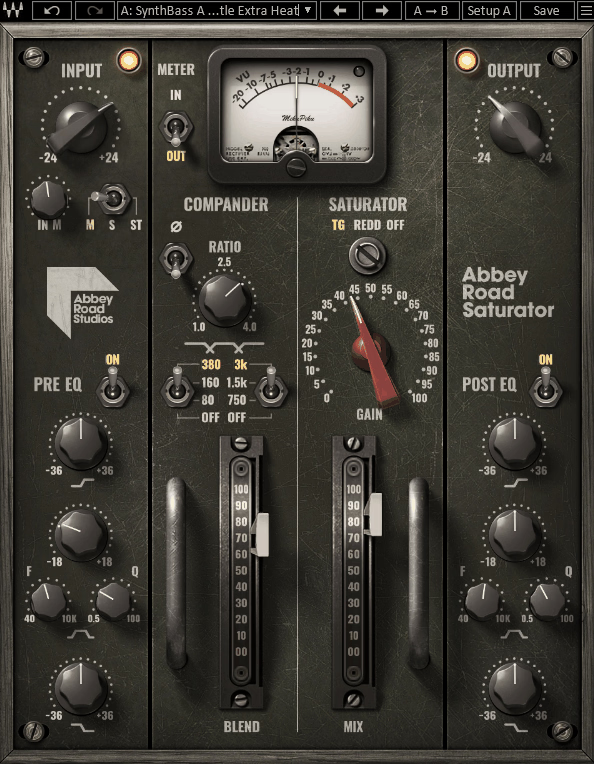
Abbey Road Saturator is one of those plugins where the stereo handling genuinely changes how you can use it on a mix buss, since you can drive certain parts of your image harder than others instead of hitting the whole signal the same way. I think that kind of targeted control is what separates a plugin built around a real desk from one that’s just modeling generic tube warmth.
The plugin gives you two saturation paths, the crunchy REDD tube console sound and the rounder TG12345 solid-state tone, each with its own harmonic character.
Switching between them changes the whole feel of your track instead of just tweaking a filter, and I always try both on the same source before committing to one.
- TG12321 Compander
The plugin also models the original EMI TG12321 compander feeding into whichever desk saturation you pick, producing what Waves calls an “excited saturation” effect. I think this compander stage is honestly what gives the plugin its identity, since it’s the part you genuinely can’t get from a plain saturation circuit.
Once I understood that, I started reaching for this plugin specifically for that pushed, slightly aggressive quality you get on a vocal or a drum buss.
- Mid-Side Processing
Dedicated M-S controls let you apply saturation to the full stereo signal, or to the mid and side channels independently, which is the stereo trick I mentioned above. On a drum buss I’ll push the center hard for weight while keeping your sides open and clear.
- Pre And Post EQ
Separate EQ sections sit before and after the saturation stage. I’d recommend using the pre-stage EQ to focus saturation on a narrower band when you don’t want the whole signal affected equally.
- Compander Crossover Control
You also get control over the compander’s crossover frequency, which shifts where that excited saturation effect concentrates. Lower settings suit bass and kick material, higher values suit vocals, so I’d suggest experimenting per source instead of leaving it at a default.
3. Soundtoys Decapitator
Decapitator is built to react like real analog gear being pushed past comfortable levels instead of behaving like a polite, linear saturation curve.
I’ve noticed real personality differences between its various circuit-modeled styles once I started switching back and forth on the same drum loop, and you’ll find that isn’t something a lot of saturation plugins offer when they just give you one flavor with a drive knob.
That being said, this isn’t a subtle tool, and I wouldn’t reach for it on something that needs to stay clean, but for adding character fast it’s hard to beat.
- Five Hardware Styles
Decapitator’s five saturation styles are each modeled on a different analog unit: a Neve-style preamp, an Ampex tape machine preamp, a Chandler/EMI-style input channel, and two flavors drawn from the Thermionic Culture Vulture. Picking a style is really the first decision you’ll make with this plugin, since each one behaves so differently, and I usually audition all five quickly before settling on one for a given source.
- Drive Control
The Drive knob is the main gain control, doing double duty as both input level and saturation amount, while a separate Output control lets you compensate for the level increase.
I usually keep an eye on Output as I push Drive up, since it’s easy to mistake more volume for more saturation if you’re not careful, and that mistake has cost me more than one mix decision I later had to walk back.
- Punish Button
When Drive alone isn’t enough, the Punish button adds around 20dB of extra gain on top of whatever Drive is already doing. It’s a one-button way to push any of the five styles into extreme territory, and I mostly reach for it on sound design or parallel chains instead of a lead vocal, so keep that in mind before you commit it to something delicate.
4. Moog MF-109S Saturator
Most saturation plugins model an existing piece of hardware, but there’s no direct ancestor behind Moog MF-109S Saturator, since it came together purely as software. It grew out of a shared drive circuit buried inside Moog’s other Moogerfooger plugins, later pulled into its own tool once beta testers asked for more dynamic control over it.
I think that origin story explains why this one feels different from a typical saturation plugin the moment you open it, since the whole thing is built around dynamics responding to your playing instead of a fixed amount of drive sitting on top.
It’s a strange, characterful plugin, and I wouldn’t call it an obvious first choice if you just need straightforward mix buss glue, but for sound design it’s one of my favorites on this list.
- Envelope Follower
The built-in envelope follower can run in Mono, tracking one combined signal, or Stereo, running two independent followers for left and right. A Response control shapes how that follower’s curve reacts to your input dynamics, and I find this is really the heart of what makes the plugin feel alive under your hands.
- Bipolar Drive Circuit
The drive circuit itself is bipolar, meaning it can push your saturation in either direction instead of only adding gain in one
- Minimoog Noise Generator
A noise generator circuit modeled on the Minimoog Model D sits alongside the saturation stage, with its own Tone control for switching filter types.
I wasn’t expecting a saturation plugin to include a full noise source like this, but you’ll find it genuinely useful for adding grit or texture underneath a saturated signal.
- CV Modulation Network
Multiple CV inputs cover Drive, Drive Envelope Amount, Noise Level, Noise Envelope Amount, and Noise Tone, giving you a lot of modulation depth to work with. I like that these connect to CV outputs too, so the MF-109S can talk to the rest of Moog’s Moogerfooger lineup in your session instead of working in isolation.
5. FabFilter Saturn 2
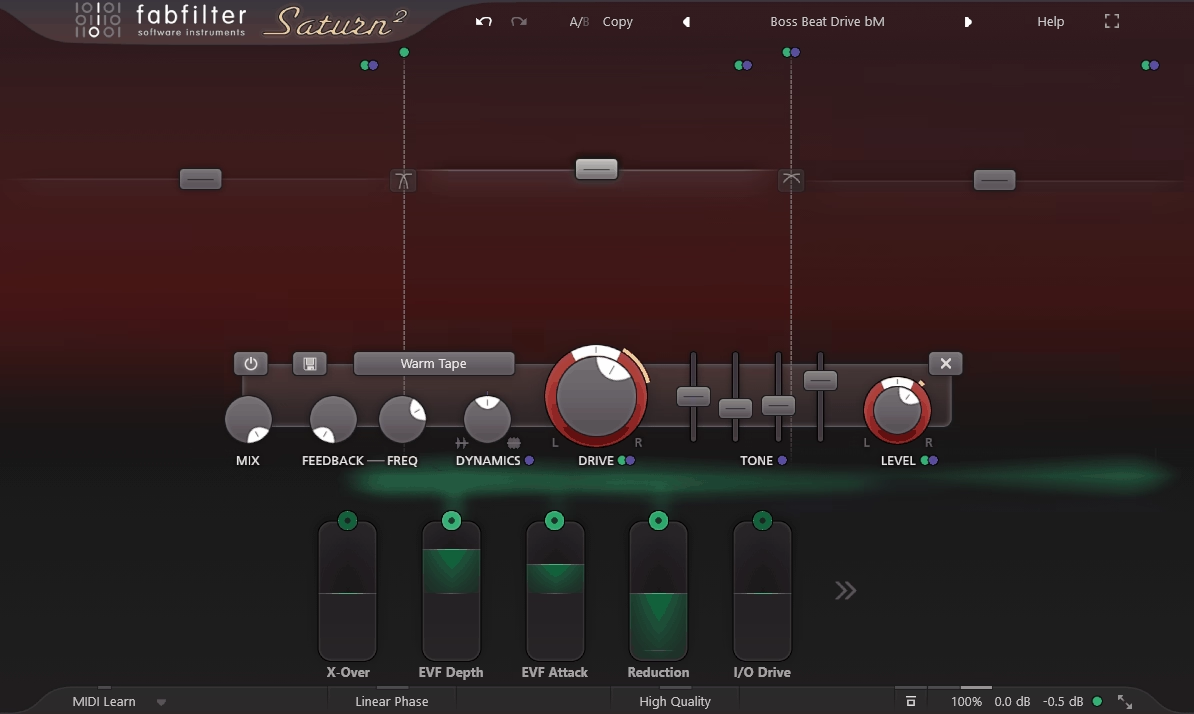
FabFilter Saturn 2 was built with band splitting built directly into one plugin instance instead of relying on external crossover filters.
That changes how I think about saturation entirely, since it stops being an all-or-nothing effect across your whole signal and starts being something you can actually sculpt by frequency range. I’d say the tradeoff is that it takes longer to dial in than a simple one-knob saturator, so it’s not always my first pick when you just need quick color on a single track.
- 28 Distortion Styles
Yes you read that right. Every band can pull from 28 distinct distortion styles, covering tube and tape coloration through aggressive American and British guitar amp emulations, transformer saturation, and bit crushing.
I find having this much variety per band means you can genuinely replace a whole chain of single-purpose saturators with one instance.
- Six-Band Processing
Saturn 2 splits your signal into up to six independent bands, each with adjustable crossover slopes of 6, 12, 24, 36, or 48 dB per octave. I like that this lets you apply completely different distortion styles to your low end, midrange, and top end within one plugin instance instead of stacking separate ones.
- Per-Band Controls
Each band gets its own Drive, Mix, Feedback, Dynamics, Tone, and Level parameters, so you’re never stuck applying the same amount of saturation across the whole spectrum
- Mid/Side Channel Mode
- Modulation System
The modulation system lets you assign 16-step sequencers, XY controllers, envelope generators, envelope followers, sliders, and MIDI sources to nearly any control
6. Black Box Analog Design HG-2MS
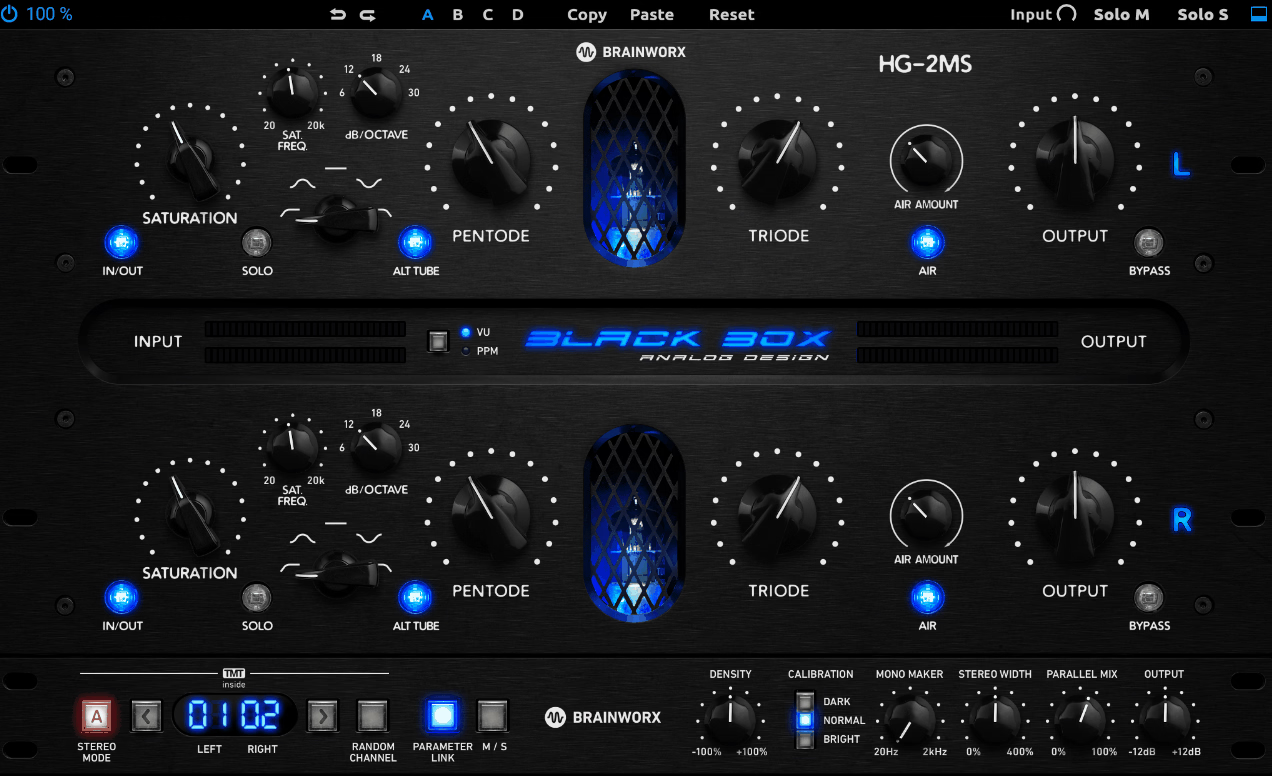
What actually sets HG-2MS apart from most tube-modeled saturators I’ve used is how deliberately it avoids sounding like one uniform wash of harmonic content.
I think that restraint is what makes it work so well on a mix buss.
You get:
- Mid-Side Saturation
The MS processing lets you drive the center and sides of your stereo signal through the tube circuitry independently, which is genuinely rare among saturation plugins. On a mix buss, I like pushing the center harder for weight while keeping the sides restrained so your stereo image doesn’t get smeared.
- Four Tube Stages
It emulates four distinct vacuum tube stages, combining triode and pentode circuits in series and parallel paths for a wide range of harmonic color. I usually lean toward more pentode on vocals, since separate gain controls for the 6U8A pentode and triode stages let you weight the blend toward either character instead of a fixed ratio.
- Redesigned Filter Section
A new filter section offers highpass, lowpass, bandpass, and bandstop modes, plus a flat option, applied independently per channel. I’ve used this to focus saturation on just the low-mids of the side channel while leaving the rest of that channel untouched, a trick you might not think to try otherwise.
- Density Control
Density pushes both tube stages harder without shifting their relative balance or changing your overall output level. I find this handy on a mastering buss specifically, where signal levels tend to creep up as a mix comes together.
7. Waves BB Tubes
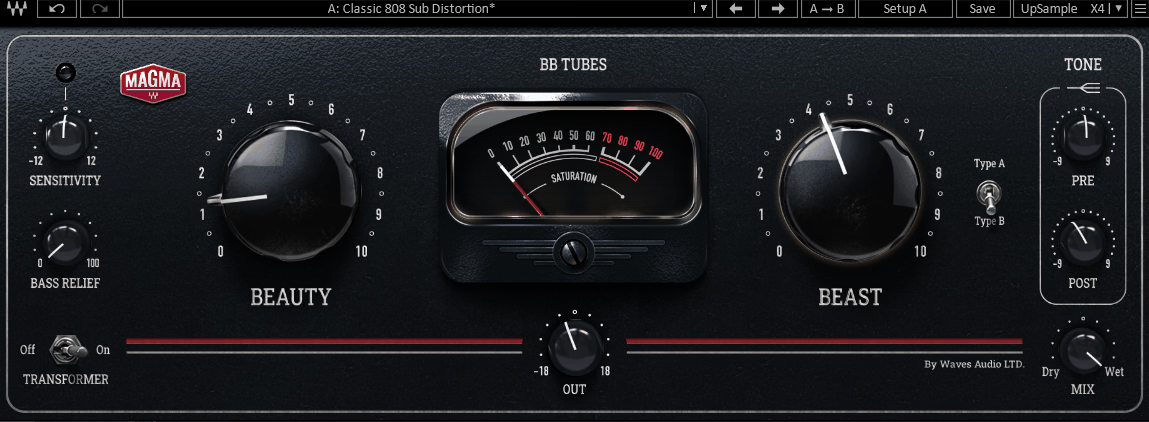
How many saturation plugins can honestly claim to sound genuinely different depending on which direction you turn a single knob? Not many, but that’s essentially the trick behind this one’s whole design, built around a spectrum with delicate coloration on one end and outright aggressive breakup on the other.
Waves BB Tubes takes that idea further than most plugins in this category by letting the gentle end feed directly into the aggressive end, so you’re blending the two instead of picking one mode and staying there.
I like that approach a lot, since it means the plugin covers a genuinely wide tonal range without needing a dozen extra controls, and I’ve found myself using it on everything from subtle vocal warmth to full-on distorted synth layers.
- Beauty And Beast
Beauty and Beast are the two core controls: Beauty delivers subtle harmonic saturation that adds roundness and glow before your sound breaks up, and Beast delivers a more aggressive, crunchier distortion character.
Because Beauty cascades into Beast, you can dial in a huge range of tones just by balancing the two, and this is genuinely the feature I described above.
- Pre And Post Tone
Simple high-shelf Tone controls sit before and after the saturation stage, letting you shape brightness going into the circuit and again coming out the other side. I find the post-stage shelf particularly useful for taking the edge off any harshness that shows up once Beast is pushed hard.
- Bass Relief
The Bass Relief control removes low-frequency content from what actually hits the saturation circuit, which keeps bass-heavy sources from turning muddy under heavy processing. On a full mix buss or a drum buss with a lot of low end, I’d recommend reaching for this before you turn Beast up very far.
8. PSP Saturator
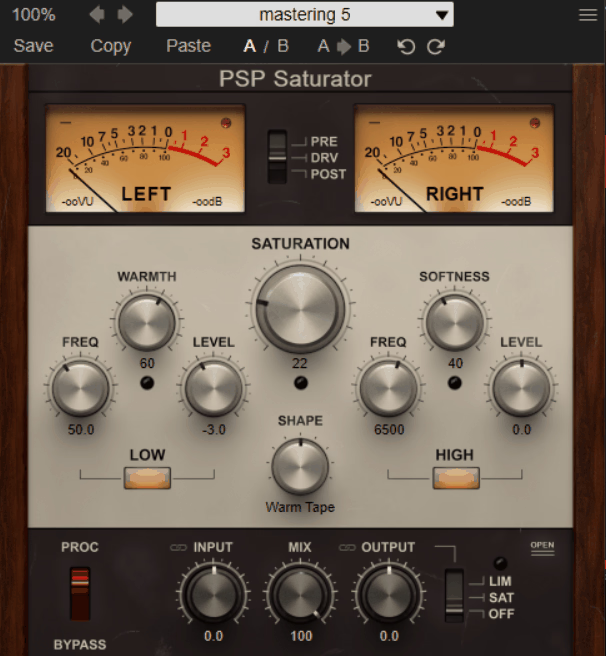
Most single-band saturators force a compromise between the low end and the top end, since both get hit with the exact same amount of processing no matter what you throw at them. PSP Saturator gets around that limitation by splitting its engine into separate paths instead of treating your whole signal as one block.
I’ve found that separation matters most on anything with a lot of low-end content, since you can shape the bottom without dragging the top end into the same amount of grit. It’s not the flashiest plugin on this list, and the interface looks a little dated, but I keep coming back to it for that band-independent control.
- Three Saturation Engines
The plugin runs three separate signal sculpting engines, one handling overall saturation and two dedicated specifically to the low and high ends. I think being able to dial in band-specific saturation without reaching for a separate multiband tool is what sets this apart from most single-band saturators you’ll find in its price range.
- Eight Saturation Shapes
Eight distinct saturation shapes are available across the engines, giving you a spread from very subtle coloration up to genuinely destructive distortion. I appreciate that the shapes feel meaningfully different from each other instead of just being the same curve at different intensities.
- Low Frequency Bump
The Low engine includes an adjustable frequency control from 20Hz to 400Hz, alongside a Level control and a Warmth amount parameter, and I like being able to target exactly where in the low end you want extra weight, whether you’re working on a kick, a bass guitar, or a full low-mid buss.
- FAT Quad-Sampling
An optional FAT mode enables quad-sampling for higher internal processing quality, which is worth switching on for final mixes or masters where CPU headroom isn’t a concern. The plugin also runs at a low internal latency of just six samples, so it stays practical if you’re tracking too, and I’ve never had to bounce a track early just to get around processing delay.
9. Softube Harmonics
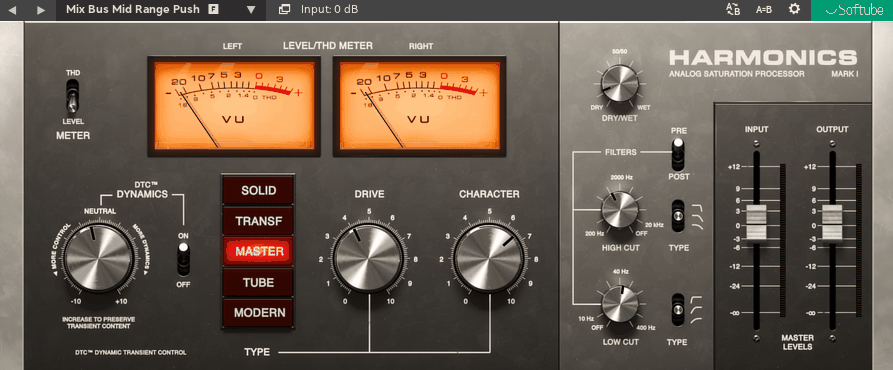
Distortion has a bad habit of flattening the exact transients that made a sound interesting in the first place, and most saturation plugins just accept that tradeoff as the cost of doing business. Softube Harmonics was built specifically to solve that problem instead of shrugging it off, using a dynamics-tracking system that watches your incoming signal and preserves its transient shape through the saturation process.
I’ve genuinely found that this changes how the plugin behaves compared to a standard fixed-curve saturator, especially on drums where attack and decay matter as much as tone. That being said, it’s a fairly clinical-sounding plugin compared to a tube emulation, so if you want obvious vintage character this probably isn’t your first stop.
- Dynamic Transient Control
What Softube calls DTC tracks your incoming signal’s dynamics and lets you control how much of that transient information survives the saturation process. I find this genuinely useful on drums, where heavy distortion usually flattens the attack you worked hard to get in the first place.
- Five Distortion Models
You get five component-modeled distortion types: Solid State, Transformer, Master, Tube, and Modern, each based on a different analog distortion process. I noticed each model reacts differently to the same source material, so picking the right one matters just as much as how hard you drive it.
- Amount And Character
Amount sets your overall saturation level while Character shapes the tone or color of the distortion within whichever model you’ve chosen. I usually adjust Character after settling on Amount, since it fine-tunes brightness without changing how much distortion is actually happening.
10. XLN Audio RC-20 Retro Color
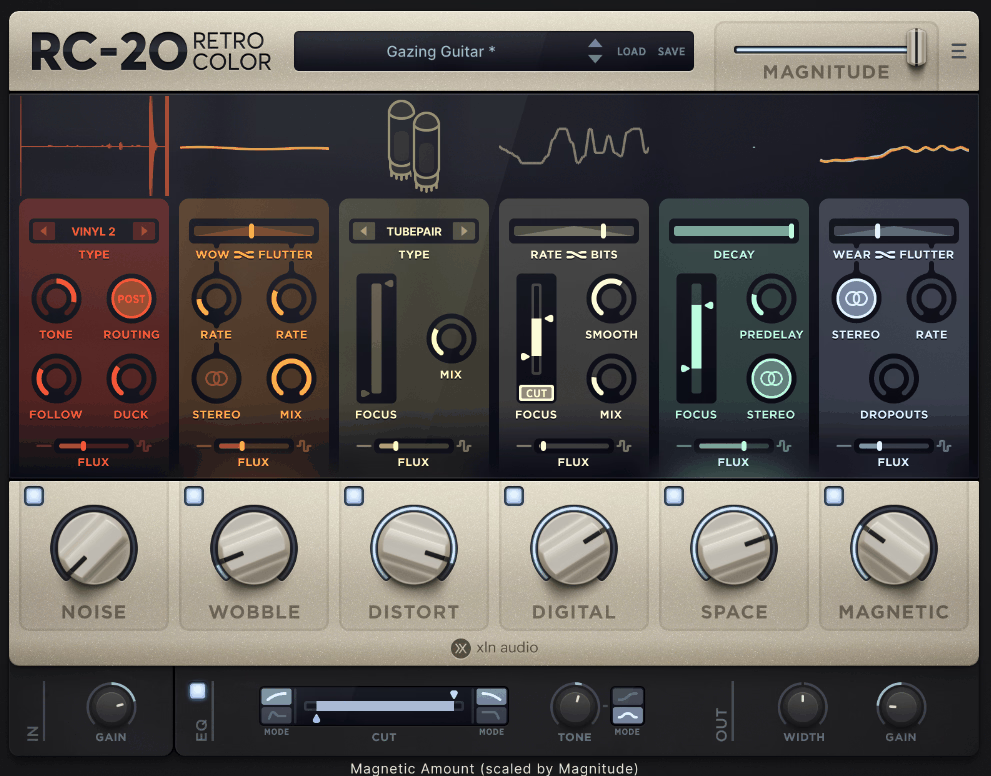
Vinyl crackle, cassette flutter, and the grit of an old VHS deck are all sounds that used to require actual vintage hardware to capture. Now they’re bundled into a single plugin instead, built around a handful of distinct effects modules that each target a different piece of that worn, degraded character you’re after.
XLN Audio RC-20 Retro Color handles all of that with a level of randomness running underneath the processing that keeps things from sounding perfectly repeatable, which is honestly the detail that sells the illusion for me.
- Six FX Modules
RC-20 splits its processing across six modules: Noise, Wobble, Distort, Digital, Space, and Magnetic, each targeting a different type of vintage character. Because they’re independently adjustable, I usually lean on just one or two for a subtle effect instead of stacking all six at once, but you can push as many together as you want.
- Flux Engine
The randomness I mentioned above comes from what XLN calls the Flux Engine, which adds subtle fluctuation and instability across every module.
It replicates the kind of imperfection you’d get from actual analog playback equipment instead of a static digital algorithm, and I think this is genuinely what keeps heavily processed material from sounding mechanically repetitive, especially once you push a module hard.
- Magnitude Slider
A single Magnitude control adjusts the intensity of all active processing at once, and it stays visible and adjustable even while you’re browsing presets. I like automating this for transitions or breakdowns, letting a section morph in and out of that vintage character without you riding six separate modules by hand.
- Magnetic Module
Magnetic simulates the wear and tear of tape playback, including tape wear, capstan issues, and dropouts, giving you that specific worn-cassette character. Combined with Wobble‘s pitch flutter, this is what I reach for when I want something to sound like it was actually recorded to tape decades ago.

Hey, I’m Vil, I started this site to help you find the best audio plugins covering various categories including synths, pianos, strings, and effect tools of all sorts as well. I pick these plugins based on various criteria so it best matches the actual topic.