When you purchase through the links on my site, you support the site at no extra cost to you. Here is how it works.
Static sounds can work in a mix, but a lot of modern production depends on rhythmic movement in filters, volume, pan, delay, distortion, and other parameters.
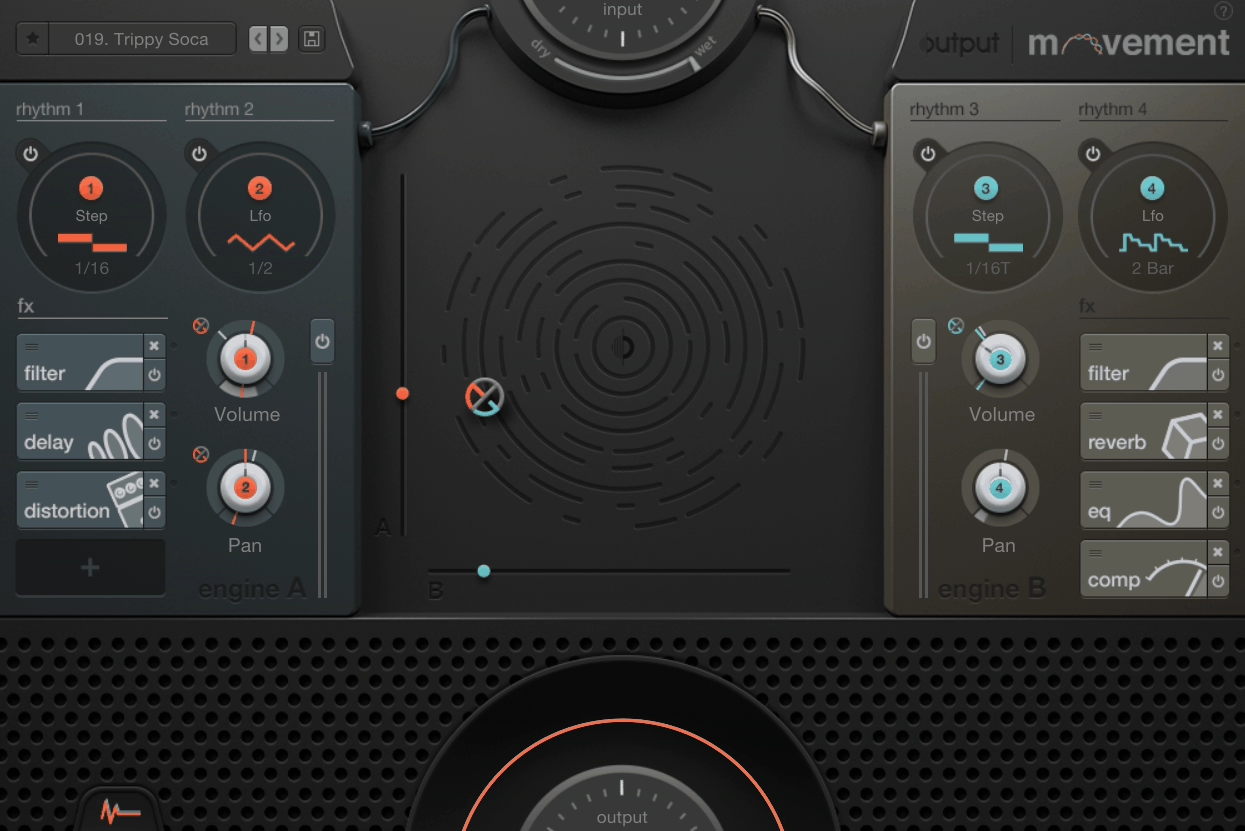
Output Movement is built around that idea, giving you four rhythm engines, a large set of modulation destinations, built-in effects, and an XY pad so you can create movement without building a pile of automation lanes.
What makes it practical is how quickly a basic sound can be given a sense of motion without turning the session into an automation project. LFO, Step Sequencer, Sidechain, and Flux cover different kinds of movement, so you can use a repeating cycle, a programmed rhythm, input-driven modulation, or more unpredictable changes depending on what the part needs.
I tend to use the more controlled options when the rhythm needs to lock closely to the track, then bring in Flux when a sound starts feeling too repetitive. You can keep the modulation subtle enough to sit behind the original part or push it until the movement becomes a major part of the sound.
Four Rhythm Engines
Movement’s four engines cover very different kinds of modulation. LFO is the straightforward option for repeating movement, Step Sequencer gives you more deliberate rhythmic patterns, Sidechain creates pumping behavior from an external signal, and Flux adds less predictable movement when a rigid pattern feels too repetitive.
I tend to start with the Step Sequencer when a part needs obvious rhythm and switch to LFO when I want something smoother. Sidechain is useful when the movement needs to follow another part of the arrangement, while Flux is the one I reach for when I want the sound to keep changing without sounding like a looped LFO.
The Step Sequencer supports 1 to 32 steps, with tempo sync, different playback directions, random mode, and note or phrase retriggering. That gives you enough room to build anything from a simple four-step pulse to a longer rhythmic pattern that evolves across a bar or phrase.
- LFO
Use it for smooth, repeating movement on filters, pan, volume, or other parameters.
- Step Sequencer
Better when you want specific rhythmic shapes rather than a continuous cycle.
- Sidechain
It can be useful for pumping and ducking effects, especially when another track should control the movement.
- Flux
It’s good when you want less predictable modulation and more variation from cycle to cycle.
Modulating the Effects
Movement is not limited to volume or filter sweeps. Its rhythm engines can modulate parameters across the built-in effects, so the same rhythmic source can control things like filter cutoff, delay, distortion, compression, reverb, pan, and other controls.
I like this most when the movement needs to affect more than one part of the sound. For example, a step pattern can open a filter while changing the amount of distortion, then let a different modulation source handle the pan, creating a much more layered result without adding another track.
You can also assign multiple rhythm sources to different parameters at the same time. That means the filter does not have to follow the same rhythm as the volume, which is one of the easiest ways to make a repetitive part feel less repetitive.
The XY Pad
The XY pad gives you a more hands-on way to control the plugin once you’ve built the modulation. Moving around the pad can morph multiple parameters at once, and the control can be used from a MIDI source for live performance.
I find that useful when I already have a patch working and want to perform the changes instead of automating every parameter separately. A small movement can bring a sound forward, make it darker, increase the rhythmic effect, or push it toward a more extreme setting depending on how the patch is mapped.
Built-In Effects and Modulation
The effects section includes filters, EQ, delay, distortion, compression, and reverb, which means Movement can create the rhythm and apply the processing inside the same instrument. That is important because the modulation is not being added after the fact; the movement is built into the effect chain itself.
For example, a filter can follow a stepped rhythm while the delay becomes more pronounced on selected steps. Reverb can swell behind the source while distortion increases during specific parts of the pattern, so the effect becomes more like an arrangement layer than a conventional insert.
I still would not use its effects as automatic replacements for dedicated processors. The value is the interaction between the effects and the modulation, not necessarily that every individual effect is the best version of its category.
Presets and Workflow
Movement includes a substantial preset library, which makes it easy to find a useful rhythmic starting point without building the modulation system from scratch. The browser also helps you narrow the search by source or modulation style rather than stepping through everything.
I usually treat presets as working examples rather than finished settings. When I find a pattern I like, I’ll change the source, swap the modulation engine, or remove an effect and listen to whether the movement still works.
That approach matters because the same preset can behave very differently on a pad and a vocal. Movement gives you a framework for creating motion, but the source still determines whether that motion feels musical or just busy.
Where I Use It Most
Sustained material is where I get the most from Movement because pads, long synth notes, strings, vocals, and atmospheric sounds give the modulation room to develop without fighting the natural rhythm of the source. I also use it on bass and synth parts when I want a little movement rather than an obvious pumping effect, since a subtle filter pattern or stereo shift can keep a repeated phrase interesting without adding more notes.
For vocals, I like using gentle movement on filter, delay, reverb, or stereo parameters so the performance stays intact while the texture changes underneath it. On electronic leads and basses, Step Sequencer or Sidechain works well when I want the processing to follow the groove, while Flux is more useful for atmospheric and cinematic parts where less predictable movement keeps a sustained sound from becoming static.
A Practical Workflow
I would start with the source and one rhythm engine rather than trying to use everything at once. Get one parameter moving in a way that already improves the part, then add another destination only when the first one is working.
For a pad, I might start with a 16-step filter pattern and keep the depth fairly low. From there, I can add a slower LFO to the stereo field or use Flux on another effect so the sound develops without every parameter moving at the same rate.
Sidechain is the better choice when you want the arrangement to control the processing. If the kick should make a pad duck, or one rhythmic element should cause another sound to react, use Sidechain rather than trying to recreate the same movement manually.
Start with one destination and make that movement work before adding anything else. You can then use different rates across separate parameters, keep the modulation shallow at first, and bring in the XY pad or MIDI control when you want the larger changes to become part of the performance.
When Less Movement Works Better
Movement can make a static part more interesting, but I get better results when the modulation has a clear job. If the source already has a busy rhythm or lots of transient information, adding another strong rhythmic layer can make the part harder to follow instead of giving it more energy.
I usually pull the modulation depth back before changing the pattern itself. A subtle filter or stereo movement can be enough to keep a pad evolving, while a deeper 16-step volume pattern makes more sense on a sound that is supposed to function as a rhythmic element.
There is also a point where using Movement across too many tracks makes the production feel overly programmed. I prefer giving one or two important parts obvious movement and letting the rest stay relatively stable, because that contrast makes the changing elements easier to notice.
For simpler jobs, I would skip it entirely. If you only need a basic filter sweep, tremolo, or sidechain duck, a dedicated effect is usually faster, while Movement becomes more useful when several parameters need to move together.
Pros
- Four distinct rhythm engines
LFO, Step Sequencer, Sidechain, and Flux cover smooth, programmed, externally driven, and less predictable movement, giving you several ways to animate a source.
- Broad modulation control
You can use the rhythm engines across multiple effect and sound-shaping parameters, which means the movement can affect much more than basic volume or filter modulation.
- 32-step sequencing
The Step Sequencer gives you up to 32 steps with tempo-synced rhythmic movement, making it useful for simple pulses as well as more involved patterns.
- Hands-on XY control
The XY pad lets you perform larger changes across multiple parameters, making the plugin useful beyond static modulation.
- Good starting point for static sounds
Presets and simple routing mean you can turn a flat pad, synth, vocal, or texture into something more active without building the entire system manually.
Cons
- Not a general-purpose mixing tool
You get more value from the modulation system than from using it as a replacement for specialist EQ, compression, reverb, or mastering processors.
- Can become too recognizable
Heavy use of similar presets or patterns can give multiple tracks the same rhythmic fingerprint, especially when the modulation is left mostly unchanged.
- Complex patches need restraint
Once several rhythm engines and destinations are active, it becomes easy to create movement that sounds busy rather than musical.
- Best on material with room to move
Fast, transient-heavy parts can sometimes fight the modulation instead of benefiting from it. I generally get more from Movement on sustained or harmonically rich sources where the changes have space to develop.
Verdict
Movement’s appeal comes from making rhythmic modulation feel like part of the sound-design process rather than another automation task. You can take a static pad, synth, vocal, or texture and give it a controlled pulse, filter movement, stereo changes, or pumping without building each element separately.
I would especially consider it when you regularly work with sustained electronic, ambient, cinematic, or sound-design material and want several parameters to move together or at different rhythmic rates. The four rhythm engines, modulation routing, effects, and XY control give you enough range to go from subtle movement to much more obvious rhythmic processing.
For simpler tracks, I would not force it into the workflow just because it is available. If a basic tremolo or filter already solves the problem, use the simpler tool; Movement earns its keep when you need several parts of the sound to evolve together or want the modulation itself to become part of the arrangement.
Hey, I’m Vil, I started this site to help you find the best audio plugins covering various categories including synths, pianos, strings, and effect tools of all sorts as well. I pick these plugins based on various criteria so it best matches the actual topic.