When you purchase through the links on my site, you support the site at no extra cost to you. Here is how it works.
Good sound design starts with control over movement, texture, and tone, not just piling effects onto a signal. This list focuses on tools that can turn ordinary audio into something more distinctive, whether that means granular manipulation, physical-modeling effects, rhythmic processing, distortion, resynthesis, or unusual modulation. There are also a few free options worth knowing, including Vital, Deelay, Hysteresis, and Fracture.
The first pick, Lunacy Audio BEAM 2, takes a practical approach with its modular node graph, letting you build parallel and serial effect paths without fighting your DAW’s routing.
From there, the list gets progressively stranger, with tools for reshaping, transforming, and rebuilding sounds in ways that are difficult to achieve with conventional effects. That is what I look for in the best sound design plugins.
1. Lunacy Audio BEAM 2
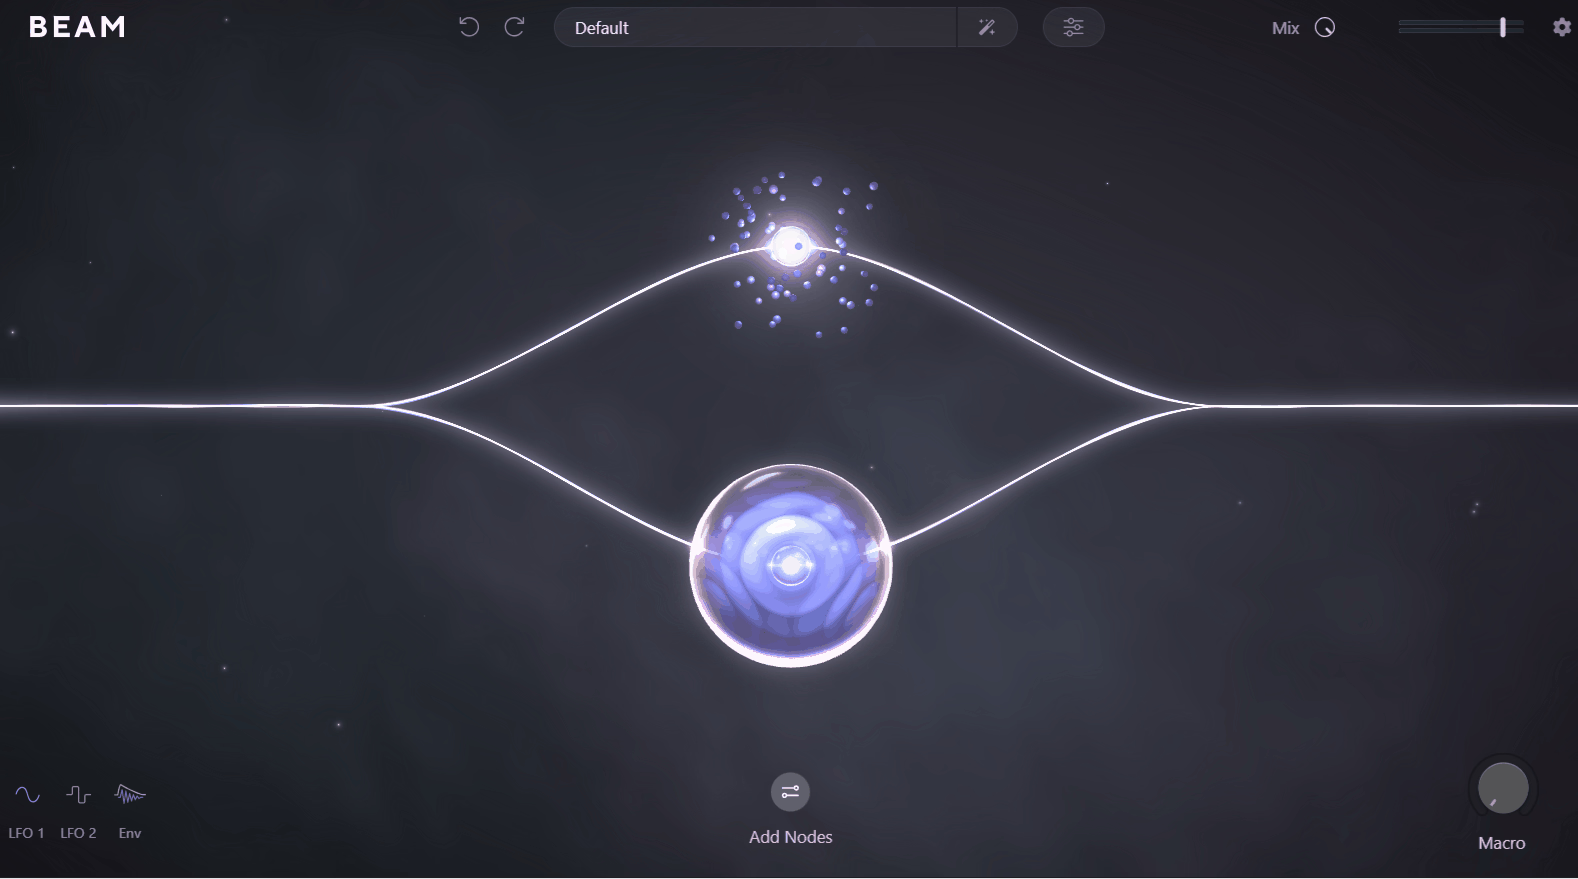
Most multi-effect plugins hand you a fixed chain and let you shuffle the order around, which is why the node graph inside Lunacy Audio BEAM 2 feels like a genuinely different proposition. You are not filling slots here, you are building a visual audio graph by dragging effect nodes onto a canvas and wiring them however the sound actually needs.
I would say the biggest practical shift in version 2 is that the effects stopped being trapped inside that environment. When you already know the texture you want, you load one module on its own and skip the graph entirely, which matters more during a mix than it sounds like it should.
- Modular Node Graph
Effect nodes get dragged onto the canvas and connected freely, with up to six parallel paths running at the same time. Because serial and parallel chains combine without restriction, you can route a filter into a grain engine, split the result across two paths, and send only one of them through a convolution space while the other stays dry.
- Haze Node
Chorus, dispersion, and algorithmic reverb all live inside a single node. At low settings you get buttery stereo width that works on keys and pads without announcing itself, and pushing the feedback turns it into something else completely, producing otherworldly resonances and reverb timbres that do not sound like any plate or hall you have used before.
- Standalone Effects
Grains, Space, Filter, and Haze all load as independent plugins outside the main engine. I like how this removes the friction from quick sessions, since opening a full modular environment to add one texture to one channel is overkill and you know it the moment you do it.
- Preset Designer
New patches get generated from scratch through a probability cluster algorithm, so a single click produces a fully wired graph you did not build and probably would not have thought of.
Paired with the 300 factory presets from designers including Venus Theory, J.Views, and Dash Glitch, it turns into a legitimate idea generator.
- Impulse Library
The convolution side draws on impulses spanning tonal, dispersion, and noise blur categories alongside more conventional halls, with 80 of them added in version 2. Wrapping a dry synth in metal chains or a synthetic space ends up being a two-click move.
2. Beatsurfing RANDOM Metal
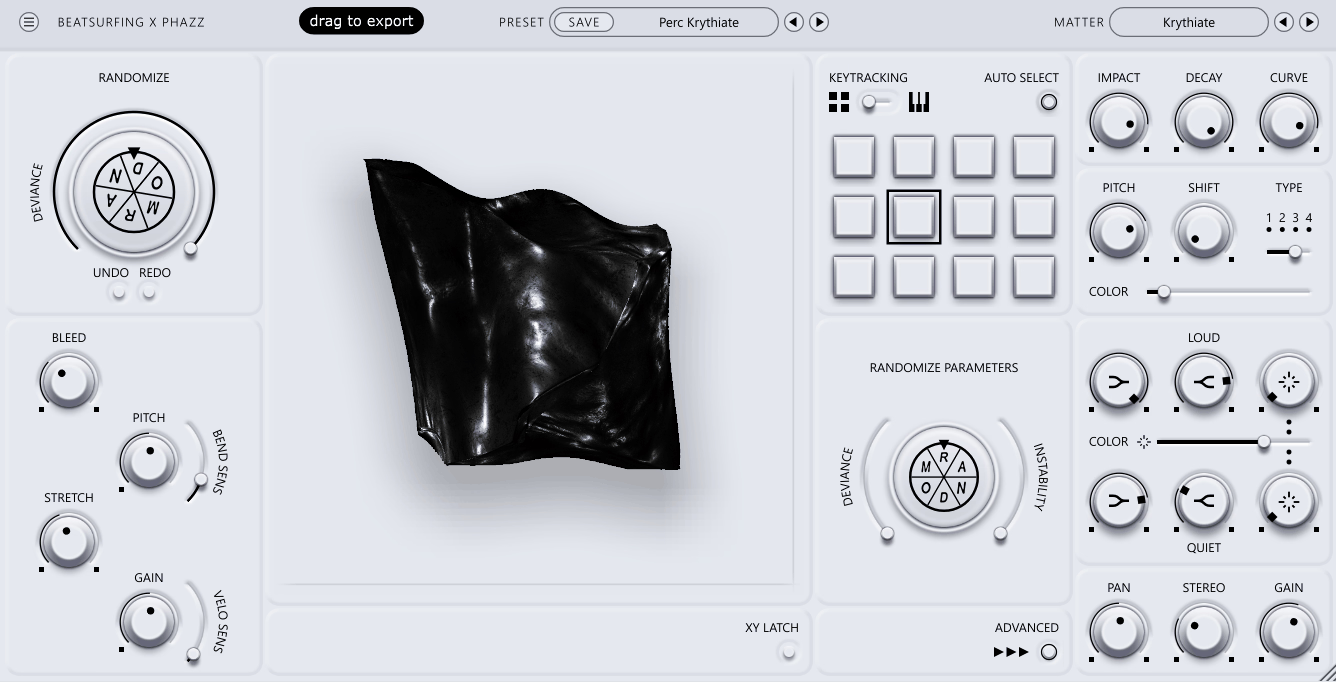
RANDOM Metal covers 40+ percussive matter types that run from aggressive metallic cymbals through shakers and hi-hats into sounds with no acoustic equivalent at all.
It came out of a collaboration between Herrmutt Lobby and Phazz, and from my perspective you can hear that it was built by people making tracks instead of people writing spec sheets. The controls are not organized the way a synth designer would organize them, they are organized around what you actually reach for when a hat is not sitting right.
- Adjustable Randomization
The RANDOM button regenerates the current sound, and the deviance amount decides how far it travels from where you started. Small values give you variations on a hat you already like, which is genuinely useful when you need four related hits across a pattern instead of one repeated sample.
Turn deviance up and the button abandons your starting point completely. I use that setting when a track needs a percussion element with no obvious reference, and I would recommend treating it as a browsing tool at that point, since at that point you are auditioning the engine instead of editing a sound.
- Expressive XY Pad
Hundreds of dynamic parameters sit under the pad, and the set is unique to each engine. Dragging around it feels less like tweaking a filter and more like exploring a space, because the mapping changes character entirely depending on which matter type is loaded.
- Individual Pad Parameters
Every pad gets instability, impact, decay, curve, gain, pitch shift, FX color, and type. What stands out to me is that instability and curve are the two doing the heavy lifting, since they are what pull a chaotic random result back into something that sits in a groove instead of fighting it.
That is really the whole workflow in a nutshell. You randomize until something interesting appears, then you use the pad controls to make it usable, and the fact that both halves live in the same window is why this stays fast.
- Dual Modes
Twelve pads can be triggered individually, or the whole instrument switches to play chromatically across the keyboard. I like how that second mode turns a percussion tool into a tonal one when the loaded matter type has enough pitch content to support it, which is not something most drum synths bother offering.
The Loud and Quiet knobs work on a similar principle, shaping the amplitude of the high and low frequency content separately. It is an odd way to present dynamic control and it works better than it reads, mostly because percussion lives or dies on transient balance and this gives you grip on both ends at once.
3. Polyverse Supermodal
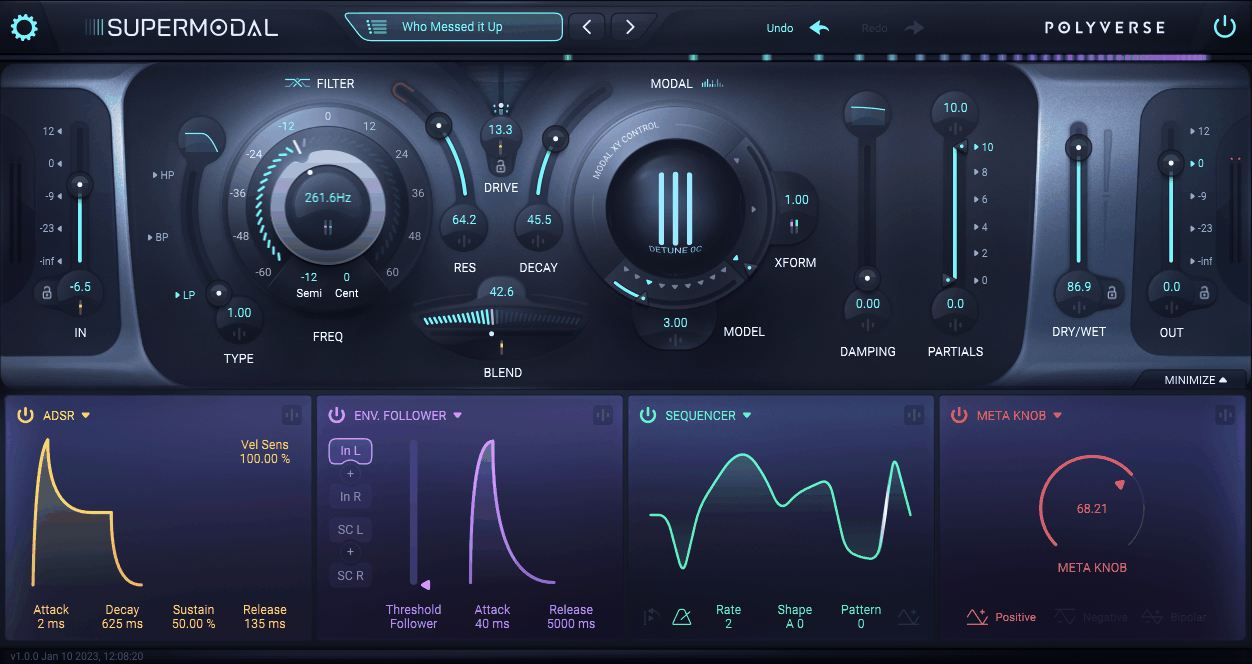
Filters mostly do one of two things. They get out of the way, or they scream, and Polyverse Supermodal sits in a third category that barely has a name for it. At the core of it is a modal filter built from hundreds of narrow bands, tuned to emulate the resonant behavior of physical bodies when something strikes them.
Nine models are on offer with three variations each, giving 27 modes covering phasers, flangers, and modeled resonators.
- Modal Resonator Engine
Hundreds of narrow filter bands recreate the standing waves that give a struck object its recognizable character. Damping pulls back the high frequencies, Decay controls how long the resonance sustains, and Partials acts as a band limiter letting you choose which portion of the filter’s range is actually in play.
I found that those three controls are where the plugin stops being intimidating. Between them you can move from a subtle wooden coloration that just warms up a pad to a fully metallic tail that dominates the sound, and it is all on the same source with no preset swapping involved.
- Parallel Blend
A Blend knob crossfades between the modal filter and the state-variable filter, and their outputs get summed for full-range results. Because you are not forced to pick one path, phasing and flanging effects arrive without the thinning that usually comes with them.
- State Variable Filter
Running alongside the modal side is a classic 24 dB per octave filter that blends smoothly from low pass through band pass to high pass. Push its resonance past 100 and it self-oscillates, and the Drive control adds thickness at both the SVF input and the modal output.
- Six Modulation Sources
Four slots each draw from an Envelope Follower, ADSR envelope, MIDI/CV input, Sequencer, Random Generator, or Meta Knob working as a macro. Nearly every parameter is a valid target, and the modulators can modulate each other for cross-modulation, so a sequencer can drive the rate of a random generator that is driving the filter cutoff.
4. Applied Acoustics Systems Objeq Delay 2
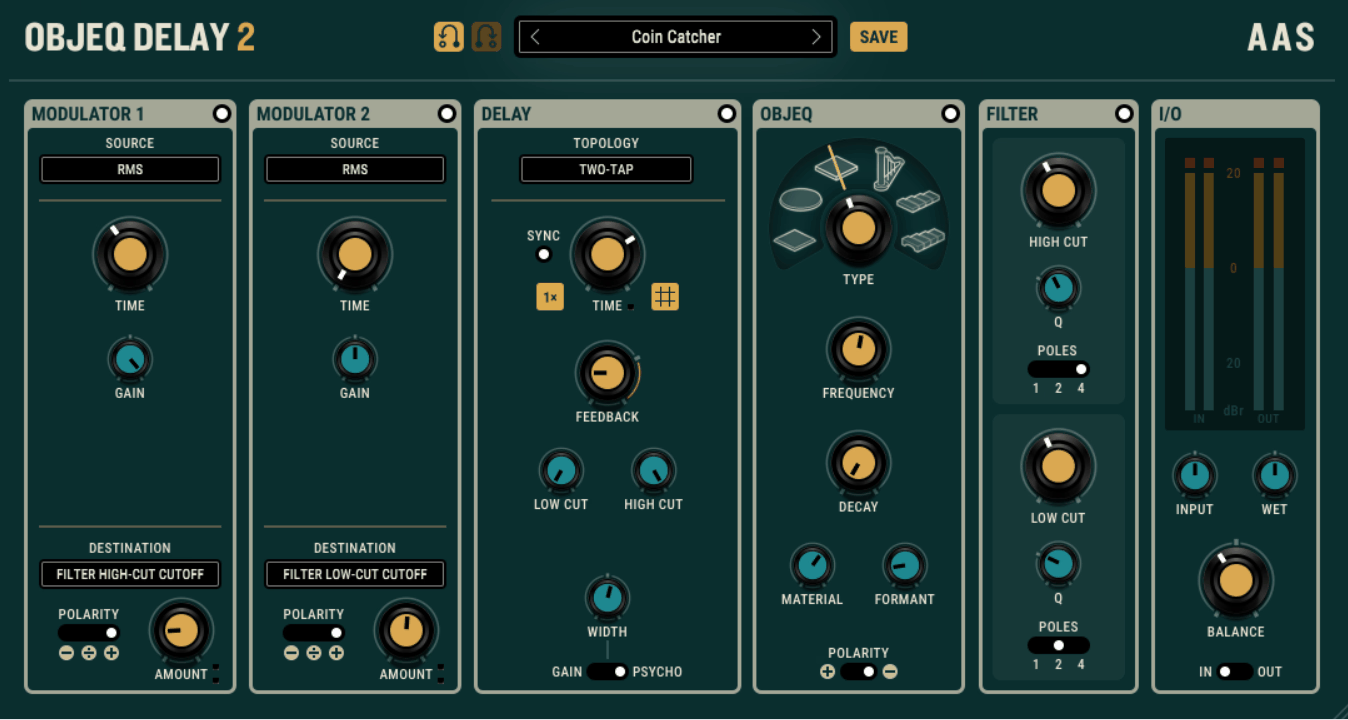
Physical modeling and delay do not usually turn up in the same plugin, which is exactly what makes Objeq Delay 2 worth more attention than its category name suggests. The idea is that echoes pass through a morphable acoustic filter on their way around the loop, so every repeat picks up the resonant character of a modeled object instead of just getting quieter.
At first glance it looks like a creative delay with a filter bolted on. In practice the Objeq module is doing most of the interesting work, and version 2 rebuilt it with morphable object types and frequency-response inversion, which is the feature I keep coming back to.
- Four Delay Topologies
One-tap handles straightforward echoes, two-tap and four-tap build rhythmic patterns across the stereo field, and split opens up more intricate manipulation between the channels. Switching topology changes the fundamental behavior of the effect and not merely its timing, so one preset realistically becomes four different ideas.
Select modes also add psychoacoustic panning, which places repeats using spatial cues instead of straight amplitude panning. It reads as genuinely wide on headphones and holds together when the mix collapses toward mono, which is more than I can say for most ping-pong implementations.
- Frequency Response Inversion
Inverting the object’s response turns its resonant peaks into cuts. I find this depth valuable when the modeled tone starts dominating, because you keep the object’s fingerprint while removing the ringing that was pulling focus away from everything else.
- Dual Modulators
Two assignable slots draw on LFOs, chaos generators, envelope followers, RMS, pitch tracking, and quantizers. Pitch tracking is the one I would point at first, since tying the resonator to the incoming note keeps long modeled tails musical instead of letting them fight the harmony underneath.
- Preset Library
More than 100 presets ship with version 2, organized for quick browsing. I suggest passing through them once even if you build everything from scratch, because the topology and modulator pairings are combinations you would not stumble into on your own.
5. Sugar Bytes Graindad
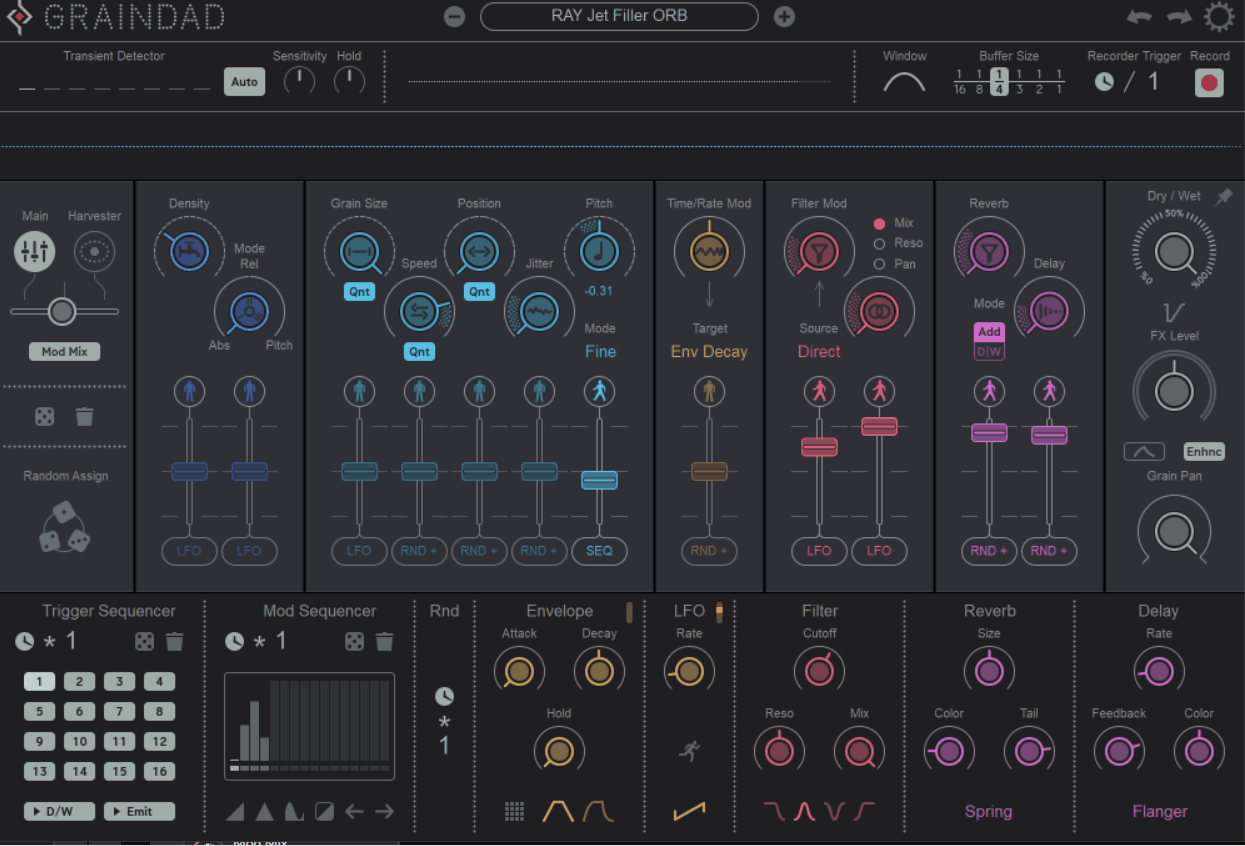
Plenty of granular processors are content to smear whatever you feed them into a wash of texture and stop right there, and Sugar Bytes Graindad is built on a noticeably different premise. The grain engine plays back up to 64 grains at once, steered through 12 main parameters that handle looping, stuttering, timestretching, pitch shifting, reversing, and harmonizing.
Because it records incoming audio into a buffer, it also works as a granular instrument in its own right and not only as an insert effect. To be honest, that is the detail that moved it from interesting to genuinely useful for me, since capturing a phrase and then performing on it is a completely different workflow from processing a track.
- Harvester Modulation
Alongside the conventional modulators, the Harvester presents modulation as a visual system of orbits, paths, and what the interface calls moons. You control multiple parameters at once by shaping the motion instead of assigning individual routings one at a time.
I believe this is the most original idea in the plugin, and it produces the kind of interlocking parameter movement that would take a dozen LFOs to fake convincingly. Both modulation systems can also be mixed together, so a step sequencer stays locked to the grid while the Harvester drifts underneath it, and that combination is where the plugin stops sounding like software.
- Trigger Sources
Grain playback fires from transients, clocks, or MIDI notes, and that single choice changes the plugin’s personality more than any other control. Transient triggering keeps everything locked to the rhythm of the source, while MIDI triggering turns it into something you play.
For instance, when you are working on drums, transient detection keeps every grain aligned to the hits and the result still sounds like a drum loop. Switch to a clock and you immediately impose a different rhythm over the top of the same audio, which is one of my favorite ways to build a second percussion layer out of a part I already have.
- Sixty Four Grains
Grain count runs up to 64 in real time, which is more headroom than most granular effects hand you. High counts produce dense clouds where the source disappears, and low counts leave enough space that individual fragments read as rhythmic events instead of texture.
- Freeze And Slice
Buffer contents can be frozen into a sustained texture or reorganized and sliced into new orders entirely. I like how this gives you a static pad and a chopped rhythmic pattern out of the same two bars of source material, which is efficient when you are trying to build a whole section from one recording.
- Built In Effects
Multimode filters, reverbs with a shimmer option, delays, chorus, and flanger all sit inside the plugin after the grain stage. Having them in the same box matters because they are modulation targets too, so a filter sweep becomes part of the granular movement instead of a separate automation lane you have to draw.
6. UVI Shade
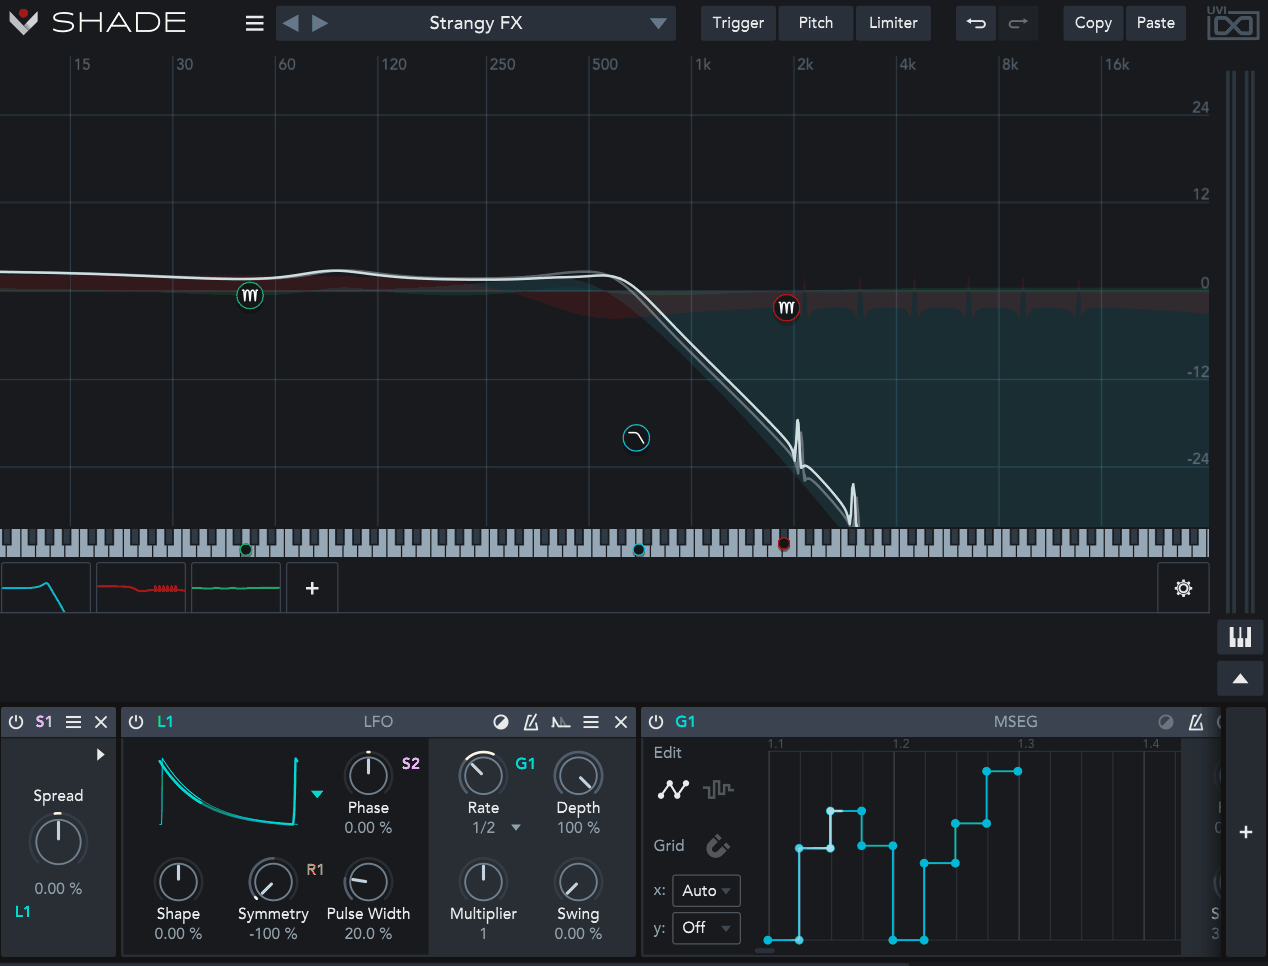
EQ plugins and creative filters usually live in separate folders on my drive. One set is for fixing problems and the other is for causing them deliberately, and very few tools do both without feeling compromised in one direction. That gap is exactly where UVI Shade lands, offering 35 filter shapes that span clean digital curves, analog-modeled nonlinear designs, and a group of multi-resonant types with no equivalent in a conventional EQ.
Resonant filters get discrete Q-Up and Q-Down controls, and every shelf and peak shape offers fully continuous slopes reaching up to 2000 dB per octave. That number sounds absurd until you realize what it enables, which is a soft-knee brickwall filter you can dial gradually from gentle to surgical without swapping plugins.
- Ten Modulator Types
The modulation system is where this stops being an EQ. XY, Macro, Spread, Random, LFO, Envelope, Figure, MSEG, and Follower can all be instanced and dragged onto any parameter in a semi-modular layout, with one-to-many and many-to-one routing supported in both directions.
Cross-modulation between modulators is allowed as well, and double-click show/hide plus click-drag rearrangement keeps a dense patch readable when you have six things running. I feel like readability is underrated in modular systems, since the moment you cannot tell what is driving what, you stop experimenting and start guessing.
- Follower With Sidechain
The Follower tracks the input, an external sidechain signal, or the spectral band of an individual filter. That last option is the one worth flagging, because it turns Shade into a dynamic EQ where a band responds to its own energy, which is precisely what you need when a resonance only misbehaves on certain notes.
- Triggerable Envelopes
Envelopes sync to the host, fire from an audio threshold, or trigger from MIDI. I would say the MIDI option changes the most in practice, since it lets a filter movement land on specific notes in an arrangement instead of running on a fixed clock and hoping it lines up.
7. Minimal Audio Rift 2
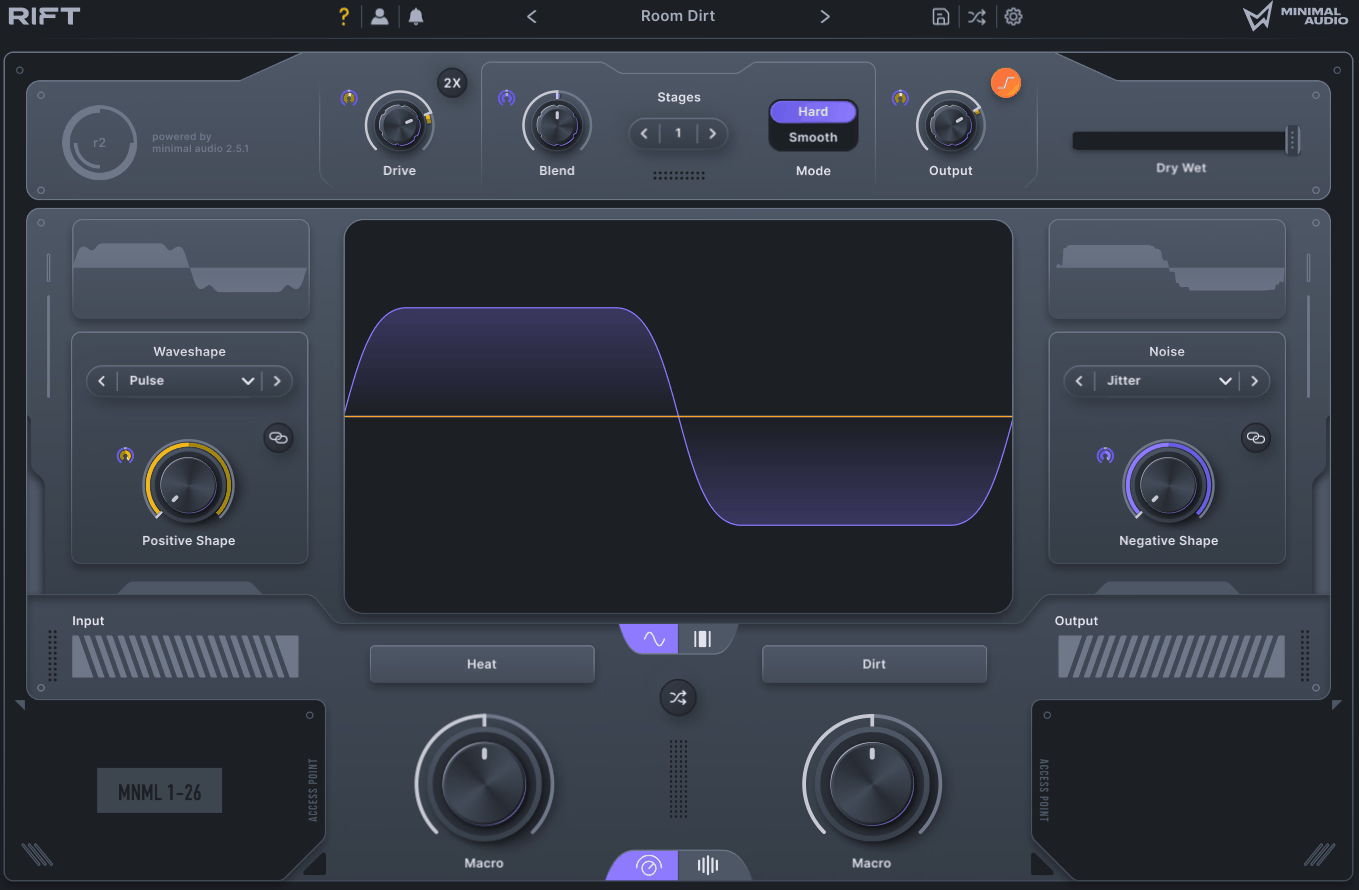
Distortion plugins nearly always treat a waveform as a single object. Push it, clip it, fold it, and you are done, which is why processing the positive and negative halves separately is such a rare approach. That approach is the entire foundation of Minimal Audio Rift 2, and it is the reason the plugin generates harmonic content that symmetrical clippers structurally cannot.
Thirty custom algorithms sit at the core, covering wave shapers, wave folders, noise injection, and bit crushers alongside processors with no obvious ancestor. Two of them blend inside the waveform engine while a visual readout shows you exactly what the resulting curve is doing to your signal.
- Multipolar Engine
Positive and negative halves get processed independently and then blended back together. On a bass this produces harmonic asymmetry that reads as weight instead of fizz, and on a lead it lets you dirty up one half of the cycle while leaving the other relatively intact.
To me this is a practical strength because the character stays controllable at extreme settings, which is not how distortion usually behaves. Most plugins collapse into the same fizzy texture once you push them, and this one keeps giving you distinguishable results all the way up. You also set the number of processing stages, stacking the same algorithm repeatedly for harmonics far richer than a single pass produces.
- Morphing Filters
24 filter types are available before or after the distortion stage, with morph and spread controls handling movement and width. Cutoff tunes to scales or tracks incoming MIDI, so a filter sweep resolves onto notes that actually belong in the arrangement.
- Multi Band Crossover
Any combination of distortion, feedback, and filtering routes through a multi-band crossover. Keeping saturation off the sub while mangling the mids is a mix decision as much as a sound design one, and I appreciate how it lives inside the distortion instead of forcing you into a separate rack.
Over 400 presets ship alongside intelligent randomization for generating variations from any starting point. I find that combination more useful than either one alone, since a preset plus a randomize pass usually lands somewhere I would not have designed on purpose.
8. Kilohearts Multipass
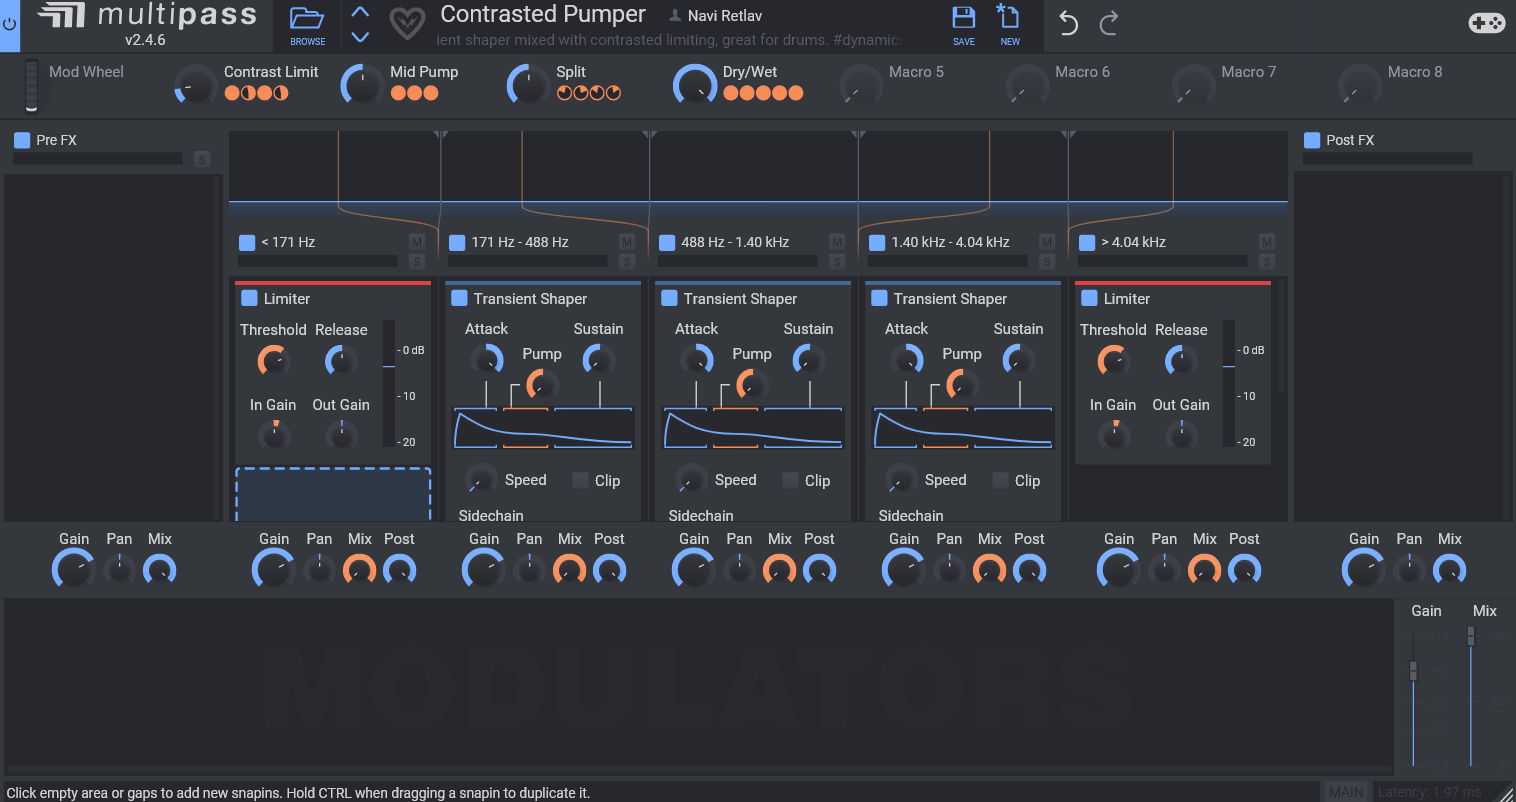
Sometimes the problem is not the effect, it is the frequency range where it is landing. You want the distortion only on the mids, the reverb only above 4 kHz, the compression only under 200 Hz, and Kilohearts Multipass is built precisely around that idea. Incoming audio splits into as many as five frequency bands, each with its own lane holding any number of Snapins.
Those Snapins are the company’s modular effect modules, and the same units also work as regular plugins outside the host. Because of that, learning one of them once pays off everywhere in the ecosystem instead of only inside this window.
- Five Band Splitter
Crossover frequencies get dragged directly on a spectrum analyzer showing the signal exactly as it enters the splitter. Each band carries solo and mute, individual Snapins can be bypassed, and auditioning one band’s processing takes a single click.
The crossovers themselves are clean enough that I have no hesitation putting this on bass material, which is usually where phasey splitters fall apart and start eating low end. That being said, the band mixer underneath deserves as much attention, since each band gets gain, pan, and wet/dry mix plus a Post knob deciding how much of that band feeds the post FX lane against how much passes straight through to the output.
- Pre And Post Lanes
Before the split there is a pre FX lane processing the whole signal, and after the bands are summed there is a post FX lane for anything applied to the recombined output. A limiter on the sum and a distortion on one band end up living in the same instance with no routing gymnastics.
- Modular Modulation Lane
Modulators and utility modules connect in arbitrary combinations along the bottom of the interface, routing to almost every parameter in every Snapin. You can build precise envelopes and LFOs, or chain utilities together into something genuinely unpredictable when that is what the track needs.
- Included Essentials
The Kilohearts Essentials collection comes bundled, giving you a working set of effects straight out of the box. Premium Snapins expand the palette later, and the honest tradeoff is that the ceiling rises noticeably once you own more of the catalog.
9. DataMind Audio Combobulator
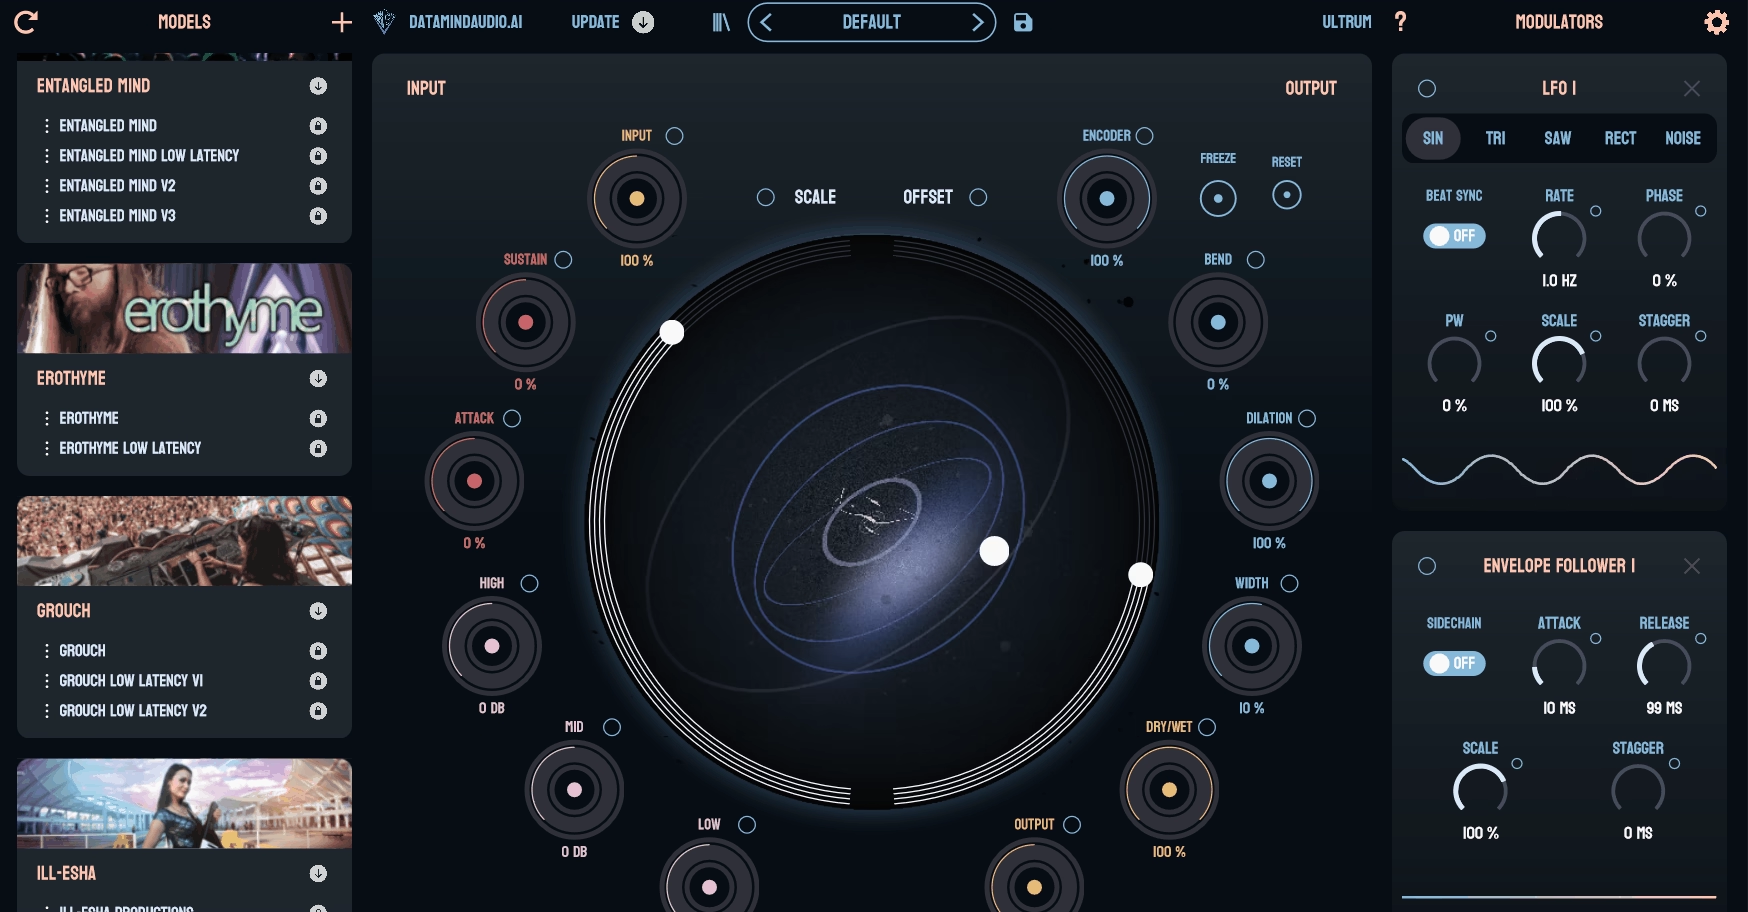
Most plugins with AI in the marketing copy are doing something you could describe using much older words. This one is not, and DataMind Audio Combobulator deserves to be understood on its own terms, since it runs real-time neural audio synthesis using audio variational autoencoders to perform a timbral style transfer on whatever you send into it.
The models are called Artist Brains, each trained on audio from a specific producer or sound designer. Your input keeps its feel and its phrasing while the timbre gets rebuilt in that artist’s sonic palette, which is a fundamentally different result from running your sound through an effect chain somebody else designed.
- Artist Brains
Every brain captures the timbral character of a specific producer, and the plugin ships with models from Rob Clouth, Encanti, and Popbot plus a Nature Models SFX brain. Additional brains trained on foley libraries in collaboration with Sound Ideas target film, TV, and game work specifically.
I would recommend swapping brains on the same input as the first thing you do, because it is the fastest way to understand what the plugin is actually doing. Your source phrasing stays completely recognizable while everything about the tone changes, and once that clicks you stop thinking of it as an effect and start thinking of it as a resynthesizer.
Right off the bat, the ethical side is also worth noting since it is unusual in this space. Datasets come directly from the artists involved, and contributors receive 50% of the gross profit on every model sale.
- Latent Modulators
Bend, Encode, Dilation, and Freeze move you around inside the model instead of across a dry/wet axis. Freeze holds a point in the latent space for sustained textures, and Dilation stretches how the model interprets time in your input.
These four are what turn the plugin from a one-knob transformation into something you can genuinely shape. Without them you are picking a brain and accepting the result, and with them you are exploring a space, which is a much better description of what sound design actually feels like.
- Real Time Operation
Audio gets transformed as it plays, with no rendering step and no offline analysis stage. I feel like that changes how you use it entirely, since you can play a part and hear the transformation while performing instead of committing first and evaluating afterward.
10. Zynaptiq MORPH 3 PRO
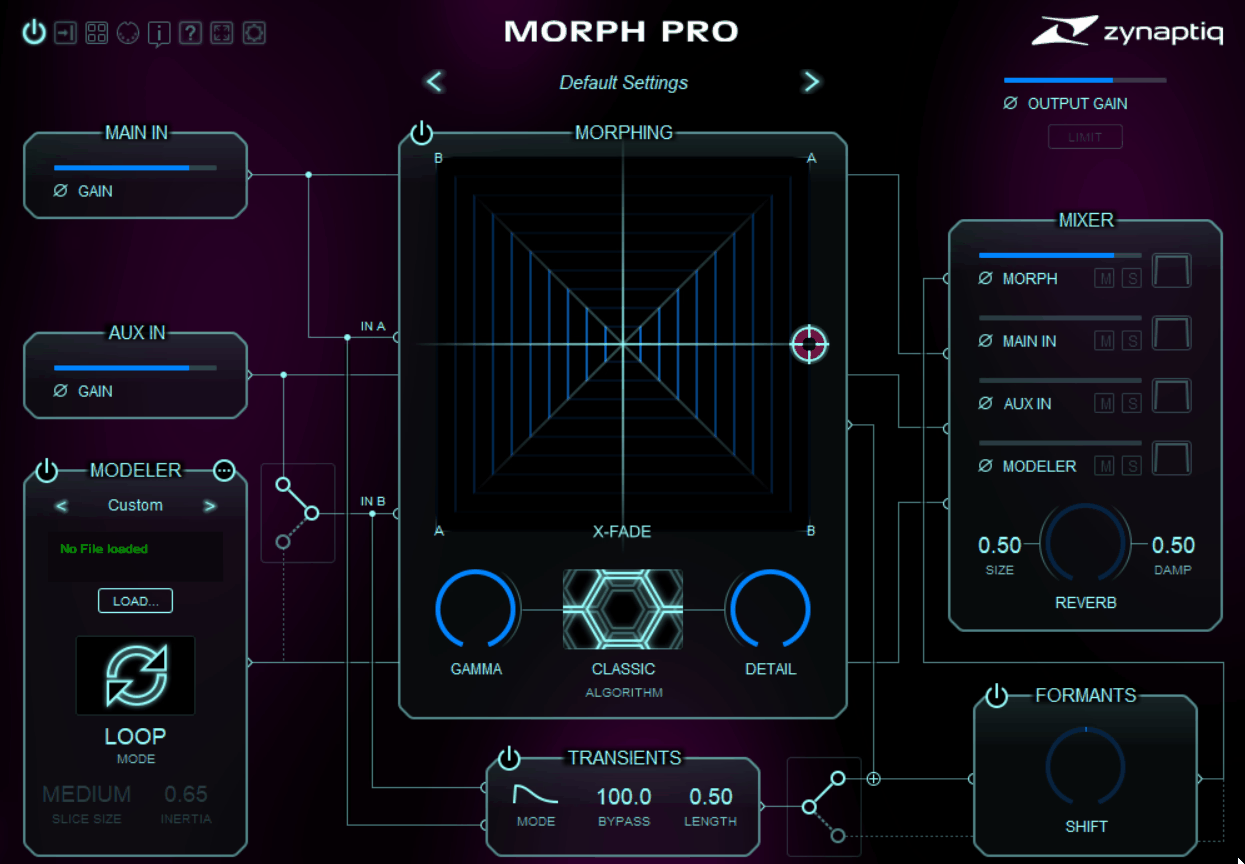
Crossfading two sounds gets you a crossfade. Layering them gets you a layer. Neither one produces a hybrid that behaves like a single coherent source, and that is the specific trick Zynaptiq MORPH 3 PRO exists to perform, taking a main input and an aux fed through the sidechain and generating something carrying characteristics of both.
Everything runs from a single two-dimensional X/Y control in real time with no analysis pass. Eleven morphing algorithms are available in the Pro tier, two more than the standard version, and two of them run with zero processing latency, which matters when you are tracking through it or performing the morph live.
- Style Transfer Modeler
The MODELER module is doing something different from the morphing engine itself. You load a file, the module segments and analyzes it, and then it rebuilds your input signal by rearranging those segments, which is closer to style transfer than to any kind of blend.
Various analysis metrics decide how the matching happens, and the Pro version adds a multi-zone graphical editor for shaping that mapping directly. In LOOP mode you can also just play a file and start morphing immediately with no routing setup at all, and I find that genuinely useful when I want to try an idea before deciding whether it deserves a proper session.
- Formant Shifter
Range extends plus or minus 24 semitones, carrying over all the algorithms from the previous version. It stays clean at extreme settings without the artifacts that usually give formant processing away, which is why it ends up doing work on projects that have nothing to do with morphing.
11. Output Portal
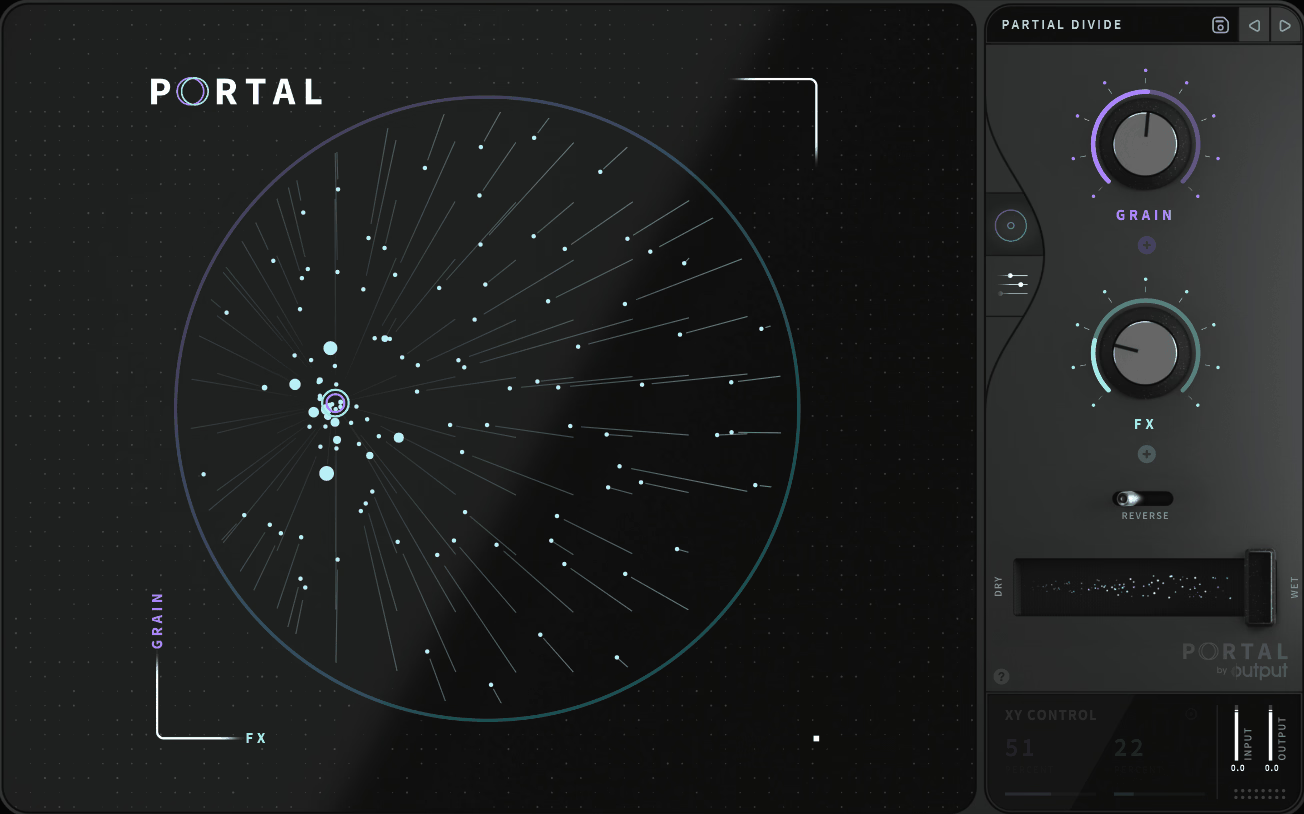
Granular effects carry a reputation for turning everything into abstract mush, deserved or not. What makes Output Portal interesting is how deliberately it works against that reputation, resynthesizing sounds that stay recognizably related to whatever went in.
There is no sample to load anywhere. The plugin applies itself to incoming audio as an insert, so a live guitar, a vocal, or a soft synth all get granulated with zero preparation, and that alone removes the biggest workflow barrier granular tools usually put in front of you.
- Preset Browser
More than 250 presets arrive organized by instrument type, covering instruments, vocals, drums, and sound design. A favorites system and built-in tooltips make the deeper controls approachable, and the advanced page opens full parameter access once you outgrow the macros.
- Seven Effect Modules
Two effect processors run in series after the granulator, drawing on a roster of seven modules including a bit reducer with sample rate and bit depth reduction and a chorus that modulates up to 500 Hz. Each processor carries its own input and output levels along with a dry/wet control.
They sit between the granulator and the master bus, so they process the dry and the granulated signal together. That placement produces a meaningfully different result from putting the same effects after the plugin, and it is worth understanding because it explains why patches here feel cohesive instead of layered.
- Grain Controls
Behavior gets shaped through density, offset, size, count, and shape, with grain pitch locking to a selectable scale or chord. In addition to that, the grain section includes time stretching, a tempo-synced grain delay, and lowpass and highpass filtering.
The grain delay is the part I keep returning to, since it routes output back to the input through a feedback control for further granularization on every pass. Stack that with the reverse function flipping grain playback direction and you have two very different destructive tools sitting right next to each other, which is a lot of range from one section.
- Scale Locked Pitch
Grains pitch up or down and snap to musical scales and chords. That single design decision is most of the reason output stays usable on melodic material, because unquantized granular pitch shifting is exactly what makes so many granular effects sound accidental.
- Humanized Envelopes
Envelopes can be humanized to introduce organic variation instead of repeating identically every cycle. Many grain parameters are randomizable as well, and combining the two is how you stop a texture from sounding looped over a long section.
12. Minimal Audio Wave Shifter
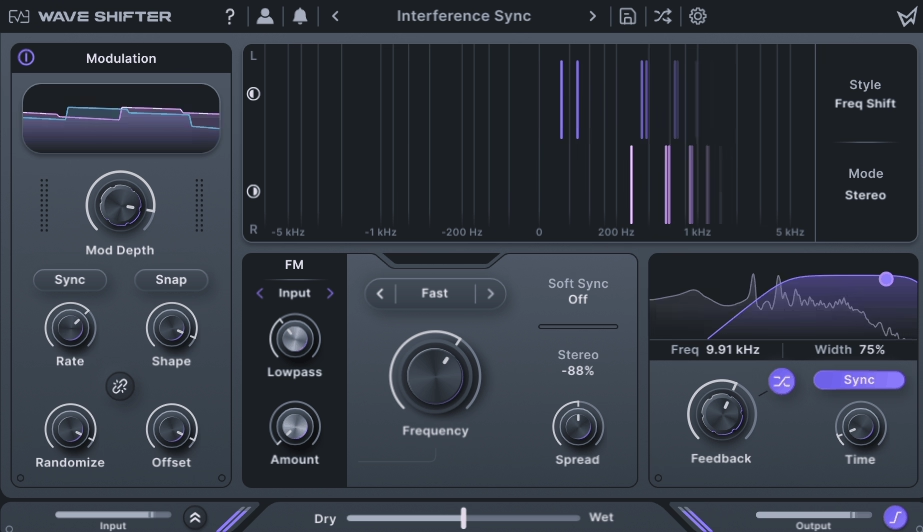
Frequency shifting sounds like a novelty until you hear it done with real control, and Minimal Audio Wave Shifter puts three related processes under one roof to make that point.
Frequency shifting, ring modulation, and amp modulation all modulate the input to generate new harmonics and inharmonic sidebands, and moving between them is fluid enough that you audition instead of committing..
Shift amounts get specified as BPM-synced values, tuned note steps, plain Hz, or slow modulation rates. On top of that, stereo spread and stereo offset let you build wide spatial textures or keep everything tight and centered depending on where the sound needs to sit.
- FM And Soft Sync
Internal FM and soft sync routing bring in behavior normally reserved for synthesizers, with seven modulation sources available including noise operators, feedback loops, and an external sidechain input. This is where the plugin stops being a modulation utility and starts being a sound design tool.
Soft sync forces oscillators to follow the input signal, producing metallic harmonic distortion with a genuinely hard edge to it.
- Three Core Modes
Frequency shifting displaces the entire spectrum without preserving harmonic ratios, ring modulation generates sum and difference sidebands, and amp modulation warps amplitude while staying closer to the source. Switching between them with identical settings loaded is instructive, since the amount of harmonic content each one produces from the same input varies enormously
- Morphing LFO
A morphing LFO with adjustable waveforms, randomization, and stereo offset drives the harmonic movement. Phase offset between channels is where the wide sweeping results come from, and it adjusts across the full range so you can dial in exactly how much separation you want.
- Preset Library
70 presets cover sci-fi effects, harmonic distortion, and rhythmic material. In-app tooltips explain each parameter contextually, and I would say that is worth mentioning because several controls here are not self-explanatory even if you know what frequency shifting is.
13. Devious Machines Infiltrator 2
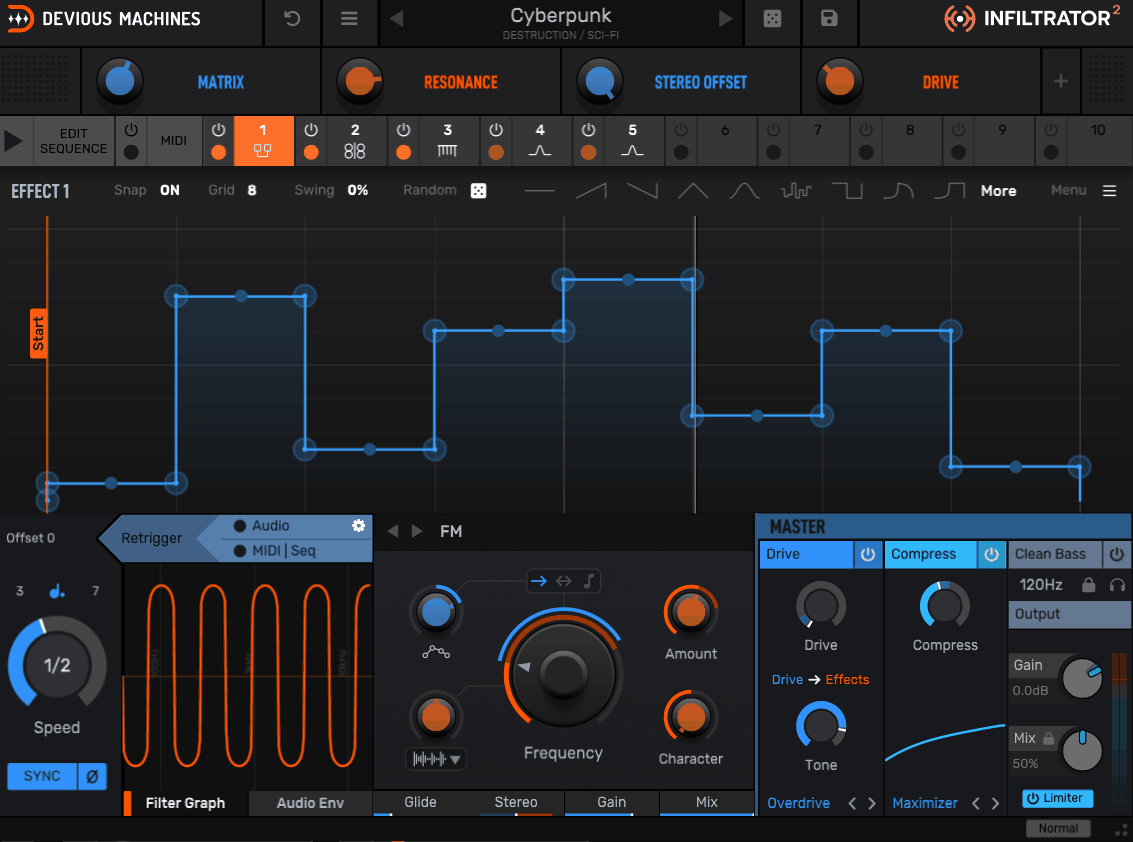
A static loop is rarely a sound problem, it is a movement problem. Fixing it means applying rhythmic modulation to something other than volume, and that is the whole design brief behind Devious Machines Infiltrator 2, which stacks, sequences, and modulates up to ten effects at once from a library of 54 modules.
The filter selection alone covers crisp digital models, liquid analog ones, plus formant, comb, notch, and dual filter designs. Beyond that you get 12 distortion models, pitch shifting, FM, delay, reverb, a vocoder, and 14 FFT-based spectral effects, with many modules carrying multiple sub-types inside them.
- Presets
Over 1500 presets ship catalogued and categorized, each with four macro controls carefully assigned. The macros are what make a library that size navigable, since you can find something close and reshape it without ever opening the module chain.
- Thirty Two Step Sequencer
Each of the 10 effect modules switches on and off per step across a 32-step grid. Punching a delay onto specific drum hits, activating comb filtering on the backbeat, or firing the looper on one step in a bar produces rhythmic patterns you would never realistically build with automation lanes.
If you would ask me when this becomes valuable, it is on percussion loops that need to develop across eight bars without being redrawn every time. You program the variation once and it plays out, which is a completely different relationship to arrangement work than drawing curves for every parameter change.
- Dual Envelopes Per Effect
Two tempo-synced multi-segment envelopes per module means one controls the main parameter while the second modulates something else inside the same effect. Eight shape presets and a randomizer get you moving quickly, and graphical editing keeps complex shapes readable.
Curves run in sync with the DAW, or they trigger from the audio input level or from MIDI notes. You can also generate random patterns and euclidean rhythms or apply swing and pitch snapping to whatever you draw, which covers most of the ways a rhythm can be interesting.
- Time Manipulation Suite
Reverse, varispeed, slowdown, and granular time-stretch all operate on the buffer instead of the tone. These are the modules I use most for transitions, since they produce effects you would otherwise bounce and edit by hand.
14. DataMind Audio Concatenator
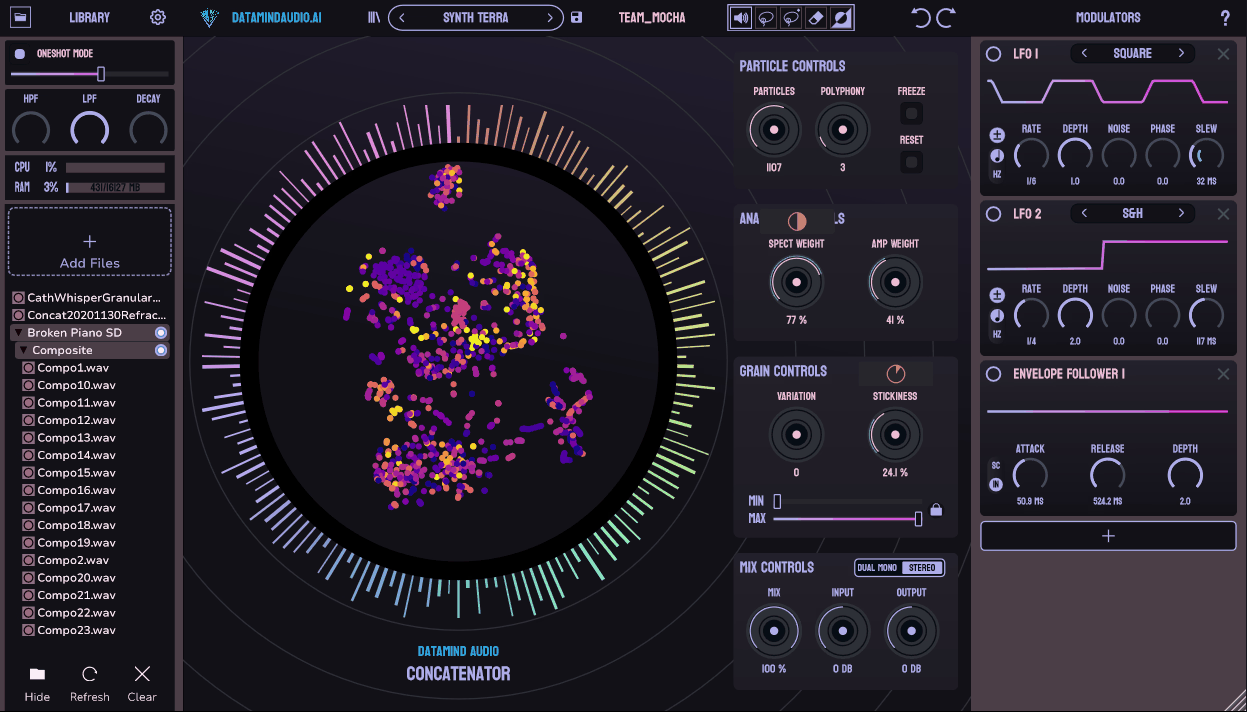
DataMind Audio Concatenator replaces randomness with a matching algorithm listening to your input. The technique is audio mosaicing, sometimes called concatenative synthesis, and the practical version is this: you load a folder of samples, play or sing something into the plugin, and it rebuilds your performance out of fragments from that folder.
Grain selection, amount, and size get guided by features of the incoming signal instead of being chosen arbitrarily. That distinction is really the whole point, because the output tracks your phrasing and dynamics while the timbre comes entirely from your own library, and latency sits under 50 milliseconds so it stays viable for live playing.
- Probability Controls
Three parameters govern how samples get chosen and reused. Variation controls sample repetition, Particle Reset re-scatters the probabilities across the selected slices, and Stickiness modulates how likely a sample is to hold once it has been picked.
- Machine Learning Control
This sets how heavily the algorithm weighs the spectral against the amplitude components of your input. Shifting that balance decides whether the result follows your tone or your rhythm, and both settings are useful for different jobs.
- Particle Count And Polyphony
Particle Count and Polyphony trade accuracy against voice count. Higher values track your input more faithfully at the cost of CPU, and lower values give a looser, sparser reconstruction that I actually prefer on percussive sources.
- Corpus Presets
Two preset types exist here. Dynamic Presets work with whatever sample combination you happen to have loaded, while Corpus Presets store the actual samples alongside the settings, and building your own out of your library is where the plugin becomes personal since nobody else’s version will sound like it.
Freebies:
1. Matt Tytel Vital
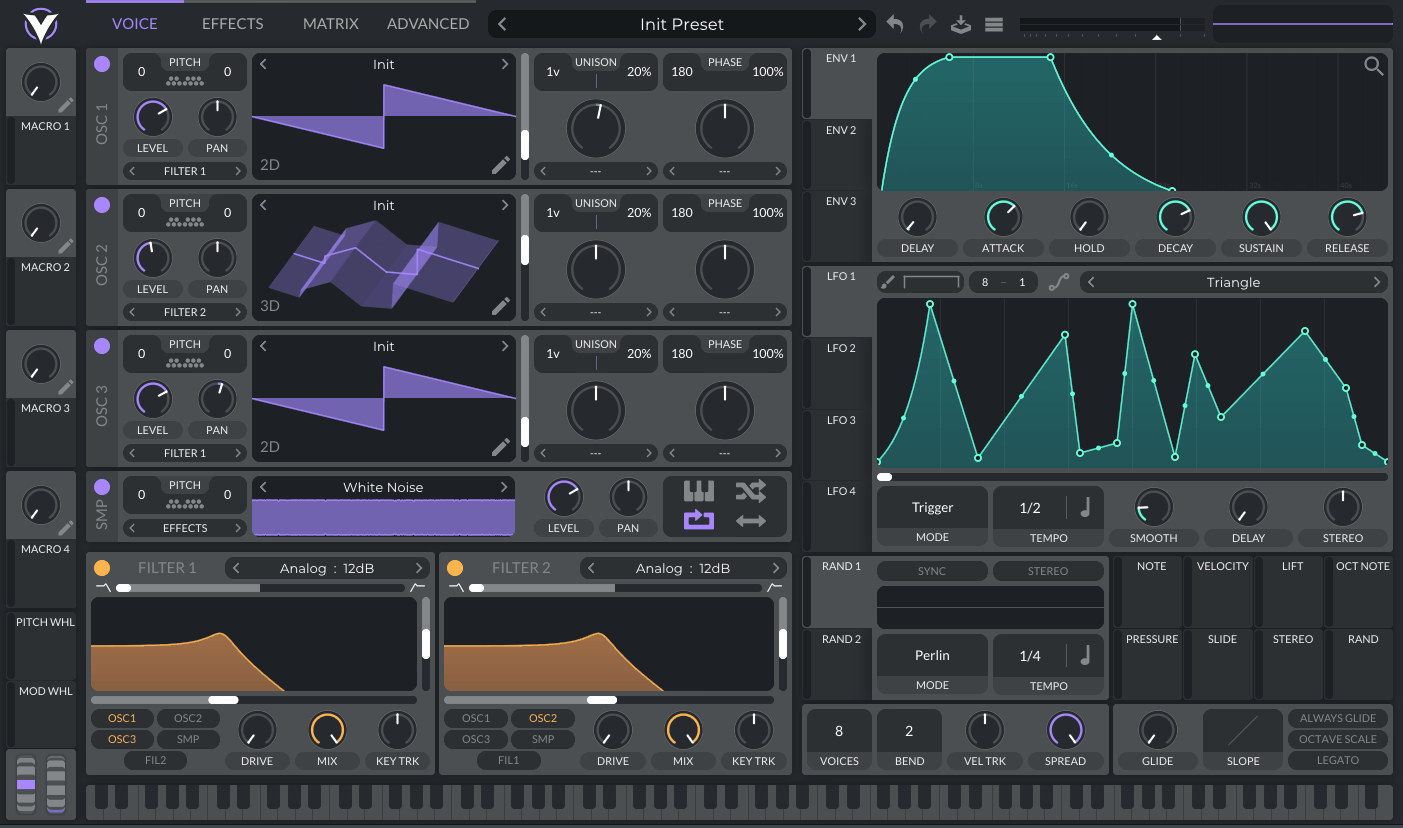
Free synths used to mean compromise. Either the sound was thin or the workflow made you work twice as hard for half the result, and that stopped being true a while ago. The clearest evidence I can point to is Matt Tytel Vital, a spectral warping wavetable synthesizer whose free edition is a complete instrument instead of a limited demo.
Three wavetable oscillators each carry their own waveshapers, unison modes, and phase adjustment, backed by a wavetable editor with adjustable grid resolution for drawing custom tables by hand. The spectral warping is the real differentiator though, letting you stretch, shift, smear, and skew harmonics around the spectrum in ways that produce timbres wavetables do not normally reach.
- Free Edition Content
The free version includes 75 presets and 25 wavetables with full synthesis capability intact. MPE support and microtonal file loading are both present, along with audio-rate FM and envelopes with custom curves, so nothing structural is held back.
- Spectral Warp Modes
Modes including Harmonic Stretch, Spectral Time Skew, Random Amplitude, and Data Compress rearrange the harmonic content of a table directly. They sit right under the oscillator knobs and take seconds to audition, which is why strange textures happen here faster than in most wavetable synths.
What I like about it is that these are not buried in a menu somewhere. You are one knob away from the weird stuff at all times, and I think that proximity is a big part of why people who learn this synth tend to develop a recognizable sound with it.
2. Integraudio Deelay
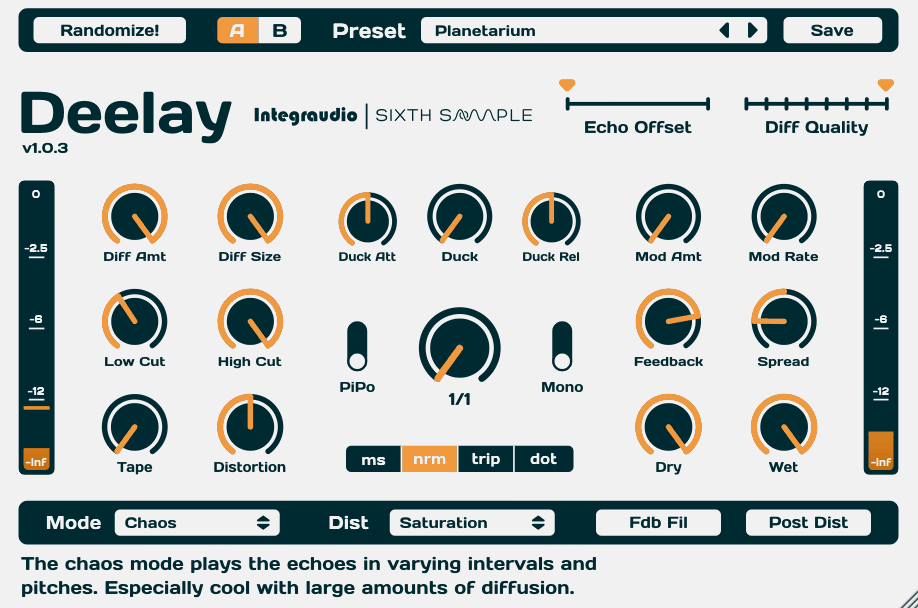
Free delays tend to split into two camps: too plain to be worth the install, or so deep that you never actually learn them. Landing between those is harder than it sounds, and Integraudio Deelay manages it while packing a surprising amount of sound design capability into a minimal layout.
Five delay modes are available: normal, reverse forward, pure reversed, chaos, and reversed chaos. Reverse forward flips the delayed signal before feeding it back, producing a reversed echo every other repeat, and the two chaos modes are where it stops behaving like a delay at all.
- Diffusion Section
Amount, size, and quality controls smear the echoes until the effect starts behaving like a reverb. Small values just soften the repeats so they sit further back in the mix, larger settings produce cinematic swells, and the quality slider decides how smooth that smearing ends up sounding.
Because of this, one plugin covers both the delay and the ambience on a lot of sources. I would not throw out a dedicated reverb over it, but for a quick space behind a synth or a vocal it genuinely saves a slot.
- Ducking
The wet signal drops in level whenever the dry signal plays, with adjustable attack and release. Honestly, I do not understand why every delay does not include this, since it solves the muddiness problem without any sidechain routing or automation.
- Tape Character
A Tape knob introduces wow and flutter. Combining a 0 ms delay time with some tape and mild distortion turns the plugin into a rough tape emulator, which is a use case the interface never advertises anywhere.
3. Glitchmachines Hysteresis
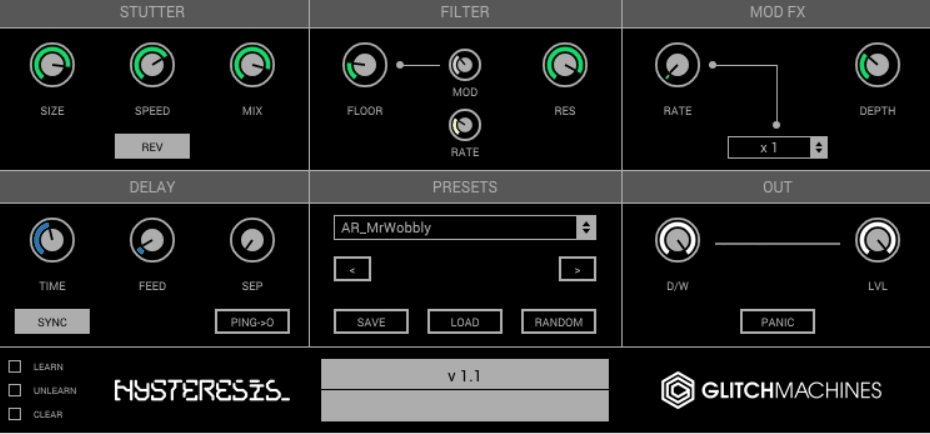
Feedback loops are where most delays reveal their real character. Put something unstable inside that loop and the entire behavior changes, and that is precisely the structure of Glitchmachines Hysteresis, which explains how a free plugin ends up producing effects that paid delays cannot reach.
Signal enters a delay line on each stereo channel, then passes through a stutter processor, then a lowpass filter, then a second delay line on the opposite channel which is itself modulated, before the output routes back to the first channel. That cross-channel path is the reason a small control set produces reverse delays, raw granulation, and noisy pitch shifting.
- Reversible Stutter
The stutter processor inside the feedback path runs forward or reversed. Because it sits inside the loop instead of after it, every repeat gets stuttered again, and those artifacts compound into something that stops resembling the source entirely after a few passes.
I think this is the single reason the plugin has stayed on drives for over a decade. Plenty of tools will stutter audio, but very few put the stutter where it feeds itself, and that placement is what produces results you cannot easily recreate by chaining separate effects.
- Sixty Presets
60 factory presets ship with it, and they demonstrate the range better than the interface does on its own. A scalable UI rounds it out.
4. Glitchmachines Fracture
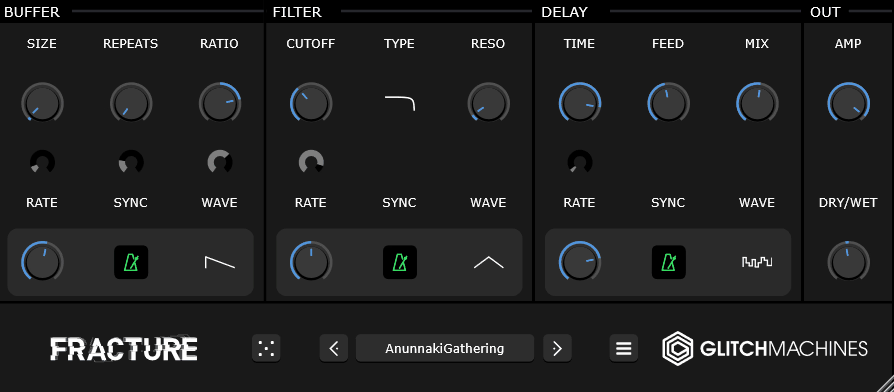
Buffer effects are a small and underrated corner of sound design, and Glitchmachines Fracture is one of very few free ones I would keep installed permanently. The layout stays minimal on purpose: a buffer effect, a multimode filter, three LFOs, and a delay.
What makes it more than the sum of those four parts is that the order of the effects in the chain gets reconfigured from a drop-down menu. Moving the filter before or after the buffer stage changes the result dramatically, which effectively multiplies how many distinct sounds four modules can produce.
- Reorderable Chain
The config menu rearranges the signal path between the buffer, filter, LFOs, and delay. I suggest paying attention to this detail because it has more impact on the final patch than most of the individual parameter values do, and it is easy to miss entirely on first use.
- Three LFOs
Three modulators run against a small set of destinations, which keeps the routing comprehensible while still generating unpredictable results. On drum loops this is where the glitchy articulation actually originates, since the buffer alone is fairly static without something moving underneath it.
- Randomize Function
One button sets every parameter to a random value. In a plugin built entirely around experimentation that is not laziness, it is the fastest path to something you would never have designed deliberately.

Hey, I’m Vil, I started this site to help you find the best audio plugins covering various categories including synths, pianos, strings, and effect tools of all sorts as well. I pick these plugins based on various criteria so it best matches the actual topic.