When you purchase through the links on my site, you support the site at no extra cost to you. Here is how it works.
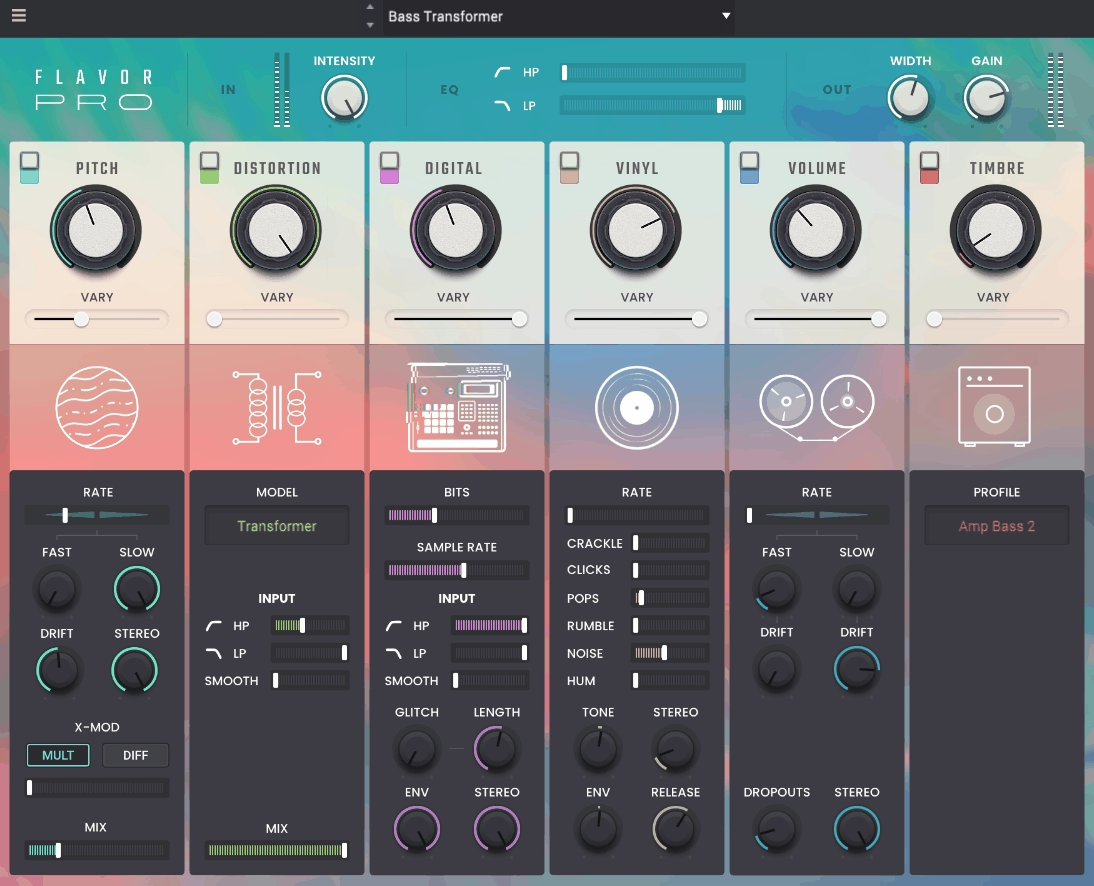
When you want a clean recording to sound older, rougher, or more like it passed through a sampler, tape machine, or vinyl setup, stacking separate lo-fi plugins can get unnecessarily fiddly. Flavor Pro puts six dedicated lo-fi stages into one interface, covering pitch movement, saturation, bit reduction, vinyl noise, tape instability, and lo-fi EQ profiles.
Clean recordings can sometimes feel too polished when the track needs a little age, movement, or grit. Flavor Pro gives you separate controls for tape-style instability, saturation, digital degradation, vinyl noise, dropouts, and lo-fi tonal shaping, so you can decide exactly which kind of imperfection the source needs instead of throwing a generic “lo-fi” effect across it.
- Wobble & Flutter
This section adds pitch instability and modulation associated with worn tape and vinyl playback, with controls for rate, depth, drift, stereo width, and variation. I use it lightly on sustained instruments when the pitch feels too static.
- Saturation & Distortion
Nine models cover tube, speaker, vinyl, and synth-style coloration, with filtering and mix controls for shaping how much of the processed signal remains. It works well when a clean sample needs some harmonic roughness rather than obvious clipping.
- Sample Rate & Bit Reduction
Bitcrushing and sample-rate reduction recreate the coarser digital character associated with older samplers, VHS, and cassette formats. You can also adjust smoothing and glitch behavior, so the effect can range from subtle degradation to obvious digital destruction.
- Vinyl Noise
You can separately control crackle, clicks, pops, hum, rumble, and noise, which makes it easier to add background imperfections without covering the entire source in one layer of noise.
- Volume Drift & Dropouts
This section emulates tape-machine level instability and dropouts, with controls for drift, stereo width, dropout behavior, and mix. I like it on sustained loops where a completely steady level makes the source feel too digital.
- Timbre
You get 32 lo-fi EQ profiles based on sounds such as radios, gramophones, and boomboxes, giving you a fast way to change the tonal identity of a source without building an EQ curve manually.
Wobble, Flutter and Drift
Pitch instability is one of the easiest ways to make a digital source feel less perfect. Wobble and Flutter let you introduce controlled pitch movement, while Drift gives the sound slower instability that feels different from a regular LFO.
I tend to keep these settings subtle on melodic material. A small amount can make a pad, piano, vocal, or sample feel like it is coming from physical playback equipment, while heavier settings are better reserved for transitions and obvious lo-fi effects.
The stereo controls are useful too. You can make the instability wider instead of keeping all the movement in the center, which works nicely on pads and sample-based textures when you want the degradation to contribute to the spatial character as well.
Saturation and Digital Degradation
The saturation section covers several types of coloration rather than giving you one generic drive control. Tube, speaker, vinyl, and synth models change the way harmonics are added, so I would choose the model based on the source instead of simply increasing the amount.
Sample-rate and bit reduction take the sound in another direction. Lowering resolution can bring out the crunchy, restricted character associated with older digital equipment, while the glitch and envelope controls let you make the degradation more animated.
For the most part, I prefer using these stages together at moderate settings. A little saturation followed by controlled bit reduction tends to preserve more of the original sound than pushing either module aggressively on its own.
Vinyl and Tape Character
The Vinyl Noise section is useful because the individual noise components are separated. You can bring in rumble without adding excessive crackle, or add a little hum and noise while keeping the source relatively clean.
Tape Drift and Dropouts work differently because they affect the level and continuity of the source. That can make a loop feel less perfectly repeated, which I find particularly useful on sampled material that otherwise loops too cleanly.
If you’re making a full lo-fi effect, these modules can work together, but I would keep the noise lower than the instinctive setting. You want the texture to support the source, not bury the part you’re actually trying to hear.
Timbre and Global Controls
The Timbre module gives you 32 ready-made EQ profiles, so you can quickly push a source toward a radio, gramophone, boombox, or similarly restricted playback character. I find this useful when I need a tonal shift quickly and do not want to spend time recreating a particular bandwidth and color with an EQ.
Global controls sit outside the six main modules and give you control over overall Intensity, high-pass and low-pass filtering, stereo Width, and output Gain. That means you can control how much of the complete treatment reaches the output without changing every module separately.
The Intensity control is particularly useful for backing off a preset after you’ve found the right character. I often prefer that to reducing every individual module because the relative balance between the effects stays intact.
Where I Use It Most
Samples are probably the easiest material to work with because the imperfections become part of the source character. Drum loops, keys, synths, vocals, and short one-shots can all benefit from controlled degradation, especially when a clean recording feels too polished.
I also like using it on loops that repeat throughout a track. Adding a little drift, wobble, or bit reduction can make the repetition less rigid without changing the underlying rhythm.
- Samples and loops
Use it to add tape instability, sampler degradation, vinyl noise, or lo-fi EQ character without building several separate processing chains.
- Synths and keys
A combination of saturation, sample-rate reduction, and Timbre filtering can make a clean digital instrument occupy a more limited and characterful sonic space.
- Transitions and textures
Heavier wobble, dropouts, and bit reduction can turn a short sound into an obvious transition or degraded texture, rather than simply making the source sound vintage.
A Practical Workflow
I would start with Timbre or Saturation and get the broad character right before introducing noise or pitch instability. Once the tone works, add only the type of degradation that supports the part.
For a tape-style effect, I might start with subtle Wobble & Flutter, then add a small amount of Saturation and Drift. For an old-sampler sound, Sample Rate & Bit Reduction becomes the main stage, with Timbre doing the final tonal shaping.
- Choose one main character
Decide whether you want tape, vinyl, sampler, or broadcast-style degradation before combining several modules.
- Keep the source recognizable
Use the Intensity and Mix controls to back off the treatment when the processing starts masking important musical details.
- Add noise last
Bring in crackle, rumble, hum, or noise only after the tonal processing works. Noise is much easier to overdo than most of the other effects.
- Compare at matched levels
Lo-fi processing can make a sound feel better simply because it becomes louder or brighter. I always level-match the processed and dry versions so I’m judging the change in character rather than the change in volume.
Presets and Workflow
The factory library includes 100 presets, which makes preset browsing useful for learning how the different modules interact. I would still treat them as starting points because the same preset can behave very differently on a vocal, drum loop, or synth depending on the source.
One useful approach is to load a preset and turn the modules off one at a time. That quickly shows whether the character is coming from saturation, pitch movement, noise, degradation, or EQ, and it makes it easier to rebuild the sound with less processing.
You can also save your own variations once you find combinations that work. That becomes more useful over time than simply relying on the factory presets because your saved patches can be built around the sources and styles you actually use.
Pros
- Six dedicated lo-fi stages
You get Wobble & Flutter, Saturation & Distortion, Sample Rate & Bit Reduction, Vinyl Noise, Volume Drift & Dropouts, and Timbre in one workflow.
- Detailed degradation controls
Individual controls for vinyl crackle, hum, rumble, tape drift, dropouts, bit reduction, glitch behavior, and pitch instability let you build a much more specific effect than a basic lo-fi preset.
- Fast tonal shaping
The 32 Timbre profiles and global Intensity control make it easy to change the overall character without rebuilding every stage.
- Works with more than samples
You can use it on melodies, loops, instruments, vocals, and sound-design material, so the workflow is not limited to making drum samples sound old.
Where It Falls Short
Flavor Pro is deliberately focused on lo-fi processing, so you are not getting the precision of a conventional mixing suite. There is little reason to reach for it when you need surgical EQ, detailed compression, transparent limiting, or corrective dynamics.
The same applies when the source already has plenty of character. Adding wobble, noise, saturation, and bit reduction to an already degraded recording can quickly make it smaller or less intelligible, so sometimes one module is all you need.
Its sound is also intentionally stylized. If your goal is transparent restoration or clean mastering, the coloration is working against what you need rather than helping it.
Verdict
A useful way to look at Flavor Pro is as a shortcut for specific kinds of degradation rather than an “everything lo-fi” effect. I can go from subtle pitch instability or saturation to obvious bit reduction, vinyl noise, and dropouts without rebuilding the chain every time, while the individual controls make it possible to keep the effect under control.
I tend to get the best results when the source already works musically and only needs a change in character. A clean synth can take some sample-rate reduction, a vocal might only need a little wobble and Timbre shaping, while a transition can handle much heavier dropouts and noise, so you can scale the processing to the role of the sound instead of using the same preset everywhere.
There is a fairly simple dividing line for whether it belongs in your setup. When you regularly need tape, vinyl, sampler, or degraded-digital character, having those processes together saves time; when your work is mostly about transparent mixing or precise correction, those controls are unlikely to become essential.

Hey, I’m Vil, I started this site to help you find the best audio plugins covering various categories including synths, pianos, strings, and effect tools of all sorts as well. I pick these plugins based on various criteria so it best matches the actual topic.