When you purchase through the links on my site, you support the site at no extra cost to you. Here is how it works.
I don’t want to keep a different compressor open for every source just because each one calls for a slightly different approach.
Pro-C 3 gives you 14 compression styles, covering everything from Clean, Classic, Opto, Vocal, Mastering, Bus, Punch, and Pumping to Versatile, Smooth, Upward, TTM, Op-El, and Vari-Mu, so you can change the compressor’s behavior without changing the whole workflow.
I’ve used compressors that sound great on one source and awkward on everything else. Pro-C 3 is more useful when I need to move between vocals, drums, buses, mastering, or electronic effects in the same session because the compression behavior can change without changing the entire setup.
- 14 compression styles
You can move between Clean, Classic, Opto, Vocal, Mastering, Bus, Punch, Pumping, Versatile, Smooth, Upward, TTM, Op-El, and Vari-Mu, with each style using different detection and compression behavior.
- Character controls
Several styles can add Drive and Character, letting you push the compressor toward more colored results instead of just keeping it purely transparent.
- Advanced sidechain
You get external sidechain input, multiple EQ bands, Mid/Side processing, and flexible stereo linking, so you can control exactly what drives the gain reduction.
- Detailed metering
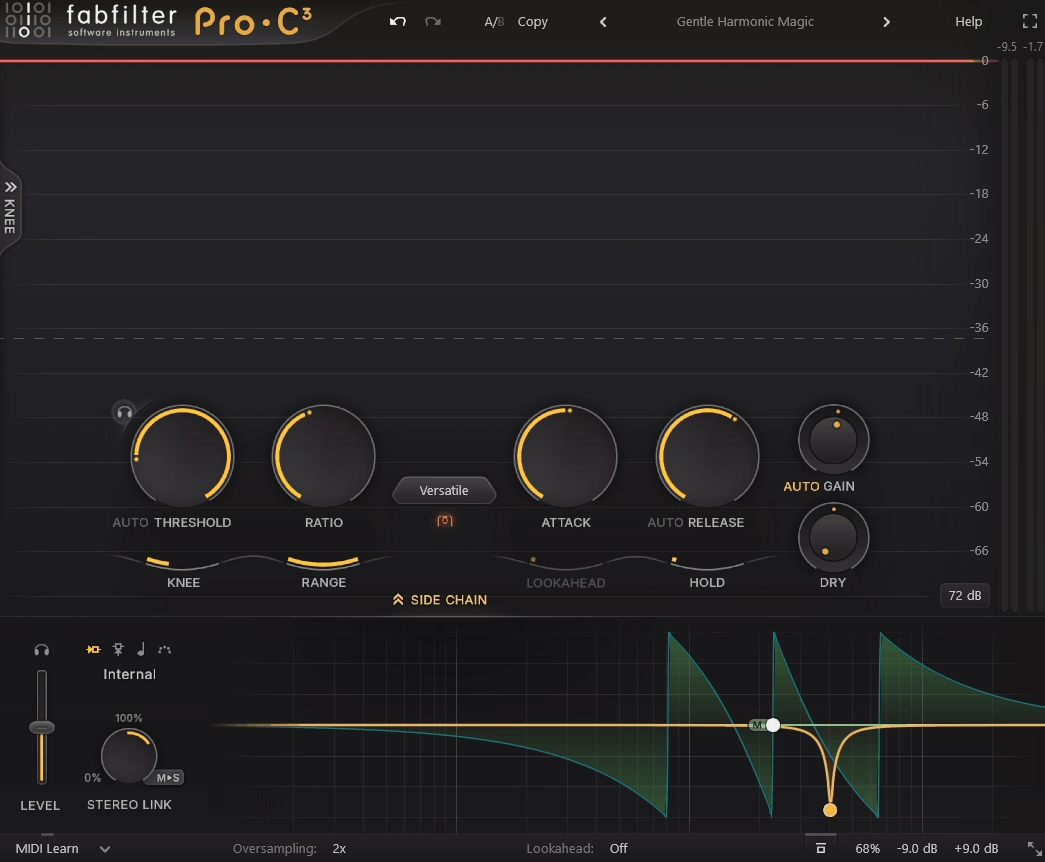
The interface gives you gain-reduction and level feedback that makes it easier to judge attack, release, and detector behavior while you work.
The 14 Compression Styles
FabFilter separates the styles into different categories, which makes the large selection easier to navigate once you know what the source needs.
I usually start with Clean when I want the dynamics to change without noticeably changing the tone. It works well on buses, mastering, and sources where I want compression to stay out of the way.
Classic has a more colored feedback character, so I like it on drums and material where the compressor should contribute to the sound. For smoother sources, Opto, Op-El, and Vari-Mu give you slower or more rounded behavior that can work nicely on vocals, bass, and instrument buses.
For more general mixing, Versatile and Smooth are useful starting points. Punch is a better fit when transient impact matters, while Vocal and Bus are tailored toward common vocal and group-processing jobs.
Then there are the more specialized options. Pumping is aimed at obvious rhythmic compression, Upward brings quieter material forward, and TTM combines upward and downward multiband compression for a much more aggressive effect.
- Clean and Mastering
I would say – use these when transparency is the priority, particularly on buses, mixes, and mastering chains.
- Classic, Opto, Op-El and Vari-Mu
These give you different forms of colored, smoother, or feedback-style compression for vocals, drums, bass, and instrument buses.
- Versatile, Smooth and Punch
Here, these are useful for general mixing, gentle glue, and transient control when you want more specific behavior without committing to a heavily colored sound.
- Vocal, Bus and Pumping
These target specific production jobs, from vocal control to bus glue and deliberate rhythmic pumping.
- Upward and TTM
In addition, these move beyond standard compression, giving you upward gain control and multiband dynamics processing for more creative applications.
Controls That Actually Matter
Once you’ve chosen a style, the familiar Threshold, Ratio, Attack, and Release controls are joined by Knee, Range, Hold, Lookahead, Auto Release, and Auto Gain. That gives you much more control over how gain reduction begins, behaves, and ends.
I use Knee to decide how gradually the compression comes in. Softer settings are easier on vocals and acoustic instruments, while harder behavior can make drum compression feel more deliberate.
Hold becomes useful when the timing of the gain reduction matters. You can keep the compressor engaged for a little longer before release, which can help create tighter rhythmic pumping or smoother control on some sources.
Lookahead is useful for fast peaks because the compressor can react before the transient fully arrives. You can use up to 20 ms, although I would not add it unless the source actually benefits from the extra control.
Auto Release can save time, but I still listen before committing to it. The same goes for Auto Gain because level matching is essential when you’re deciding whether compression actually improved the source.
- Lookahead
Lets the compressor react to fast peaks more deliberately, which can be useful on buses and mastering when you want tighter transient control.
- Sidechain and frequency control
External sidechain input and filtering let you control which frequencies trigger the compressor, rather than changing the compression just to compensate for an overly sensitive detector.
Sidechain, Metering & Visual Feedback
A compressor only reacts to what its detector hears, so sidechain control becomes especially important on buses. You can filter the detector, feed it external audio, and work in Mid/Side, which gives you more control over what actually drives the gain reduction.
I often use this on a mix bus when the kick is causing too much compression. Filtering some low-end energy from the detector is usually cleaner than changing the main threshold or ratio, because you are fixing the trigger instead of compensating for it.
The visual feedback helps with the same problem from another angle. You can see how gain reduction develops over time, making it easier to tell whether an attack setting is preserving the transient or flattening it, while the sidechain monitoring lets you hear exactly what the detector is responding to.
Practical Applications and Mastering
For vocals, I usually start with Vocal, Opto, or one of the smoother styles and set the timing around the actual phrasing. When the level changes are extreme, I’d rather use two moderate stages than make one compressor handle the entire dynamic range.
Drums give you more room to work with the timing. A slower attack can let the initial hit through, while faster settings can tighten a transient that is already too sharp, and the visual feedback makes those changes easier to judge.
On a mix bus, I keep the compression restrained and often pair Clean, Smooth, Bus, or Mastering with sidechain filtering. The goal is usually a little more control without shifting the overall balance of the mix.
Mastering calls for an even lighter touch, so I would start with Mastering or Clean, use a low ratio, and watch the stereo image and tonal balance while making small adjustments. Smooth can also work for gentle glue, but I would compare it against Clean on the actual master rather than choosing by the style name alone.
You also get immersive support up to 9.1.6, along with flexible stereo and channel linking, which matters when you’re working in surround or immersive formats.
A Practical Workflow
I usually choose the compression style first, then set the ratio and attack while listening to the source in context. Once those basics are working, I move to release and sidechain behavior rather than tweaking everything at once.
If the compressor is reacting to the wrong part of the signal, I fix the detector before changing the threshold. That usually gets me closer to the result I want with fewer adjustments.
Finally, I check the gain reduction and bypass the compressor at matched levels. I want to hear better control, improved groove, or a useful change in tone, not simply a louder signal.
Pros
- 14 genuinely different compression styles
You can move from transparent control to optical, vintage feedback, variable-mu, upward, multiband, and pumping behavior without changing plugins.
- Advanced sidechain control
External triggering, frequency shaping, Mid/Side processing, and flexible stereo linking give you precise control over what drives the compressor.
- Useful visual feedback
Detailed metering makes it easier to understand attack, release, and gain-reduction behavior, especially on buses and mastering chains.
- Deep timing and character controls
Knee, Hold, Lookahead, Auto Release, Drive, and Character give you control over both dynamics and tone.
Where It Falls Short
Fourteen styles are helpful when you genuinely need different compression behaviors, but they also add decisions and can slow you down when you only need straightforward compression. If you’re compressing a vocal or drum bus with a familiar goal, a simpler compressor may get you there faster.
The deeper controls create another learning curve. Sidechain EQ, stereo linking, Knee, Hold, Lookahead, Drive, Character, and different detection behaviors give you plenty to work with, but you need some experience to know which control is actually solving the problem rather than tweaking several settings at once.
Pro-C 3 also does not recreate one specific piece of vintage hardware. Its strength is the range of compression behaviors, not one instantly recognizable circuit, so a dedicated hardware emulation may be a better choice when you want a particular vintage tone and response rather than a flexible compressor toolkit.
Verdict
So with all that being said, FabFilter Pro-C 3 earns its place when you need compression to behave differently from one source to another. I can move from transparent bus control to punchy drums, smooth vocals, pumping effects, or more aggressive dynamics processing without changing the overall workflow, which is useful when a session covers several different jobs.
The biggest practical advantage for me is the combination of style selection and sidechain control. You can choose the behavior first and then decide exactly what should trigger it, how quickly it reacts, and how much character it should add.
You do not need fourteen styles just to compress a vocal or control a drum bus. If one familiar compressor already covers your work, Pro-C 3 may offer more depth than you will actually use; if you regularly mix different sources and styles, that flexibility is much easier to justify.
In the end, I see it as a compressor toolkit rather than a single character compressor. You get the most from it when you actually move between its different behaviors, while simpler options make more sense when you already know exactly what kind of compression you need.

Hey, I’m Vil, I started this site to help you find the best audio plugins covering various categories including synths, pianos, strings, and effect tools of all sorts as well. I pick these plugins based on various criteria so it best matches the actual topic.